|
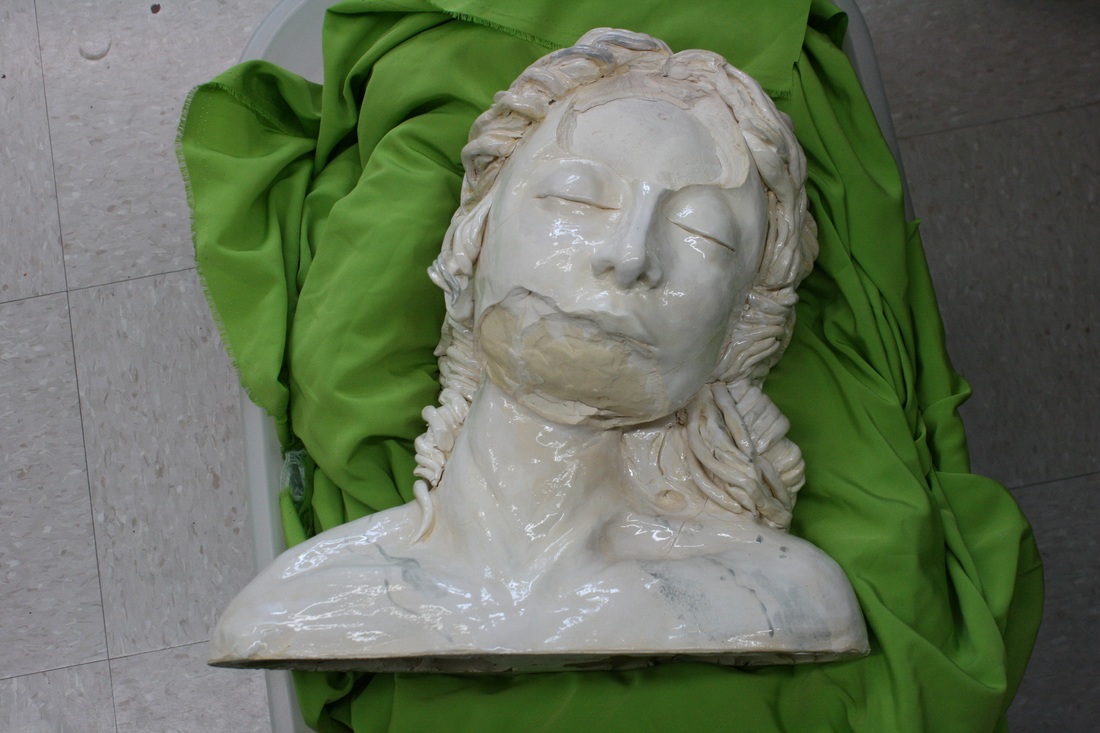
6/24/2016 0 Comments Suru KintsugiSo, it happened. BIG Kaboom. As it turns out, two weeks is not enough to properly dry such a large sculptural piece. I was running out of time; the bust needed to be completed and moved out of its location. With only days to go, I decided to go ahead and fire her... and it didn't turn out pretty. I know what my problem was; according to many sites I looked at online, including Claygeek, it's not necessarily the air bubbles that cause for the piece to explode, but the trapped moisture within that air bubble. It takes time and patience to dry a large sculpture like that, and unfortunately I ran out of time. Our kiln also does not have a preheat function, and really, she didn't fit in a house oven, unfortunately.
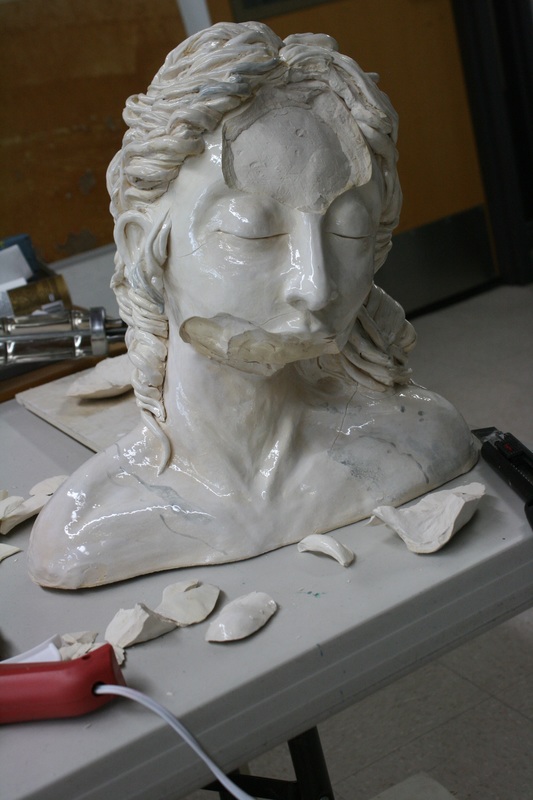
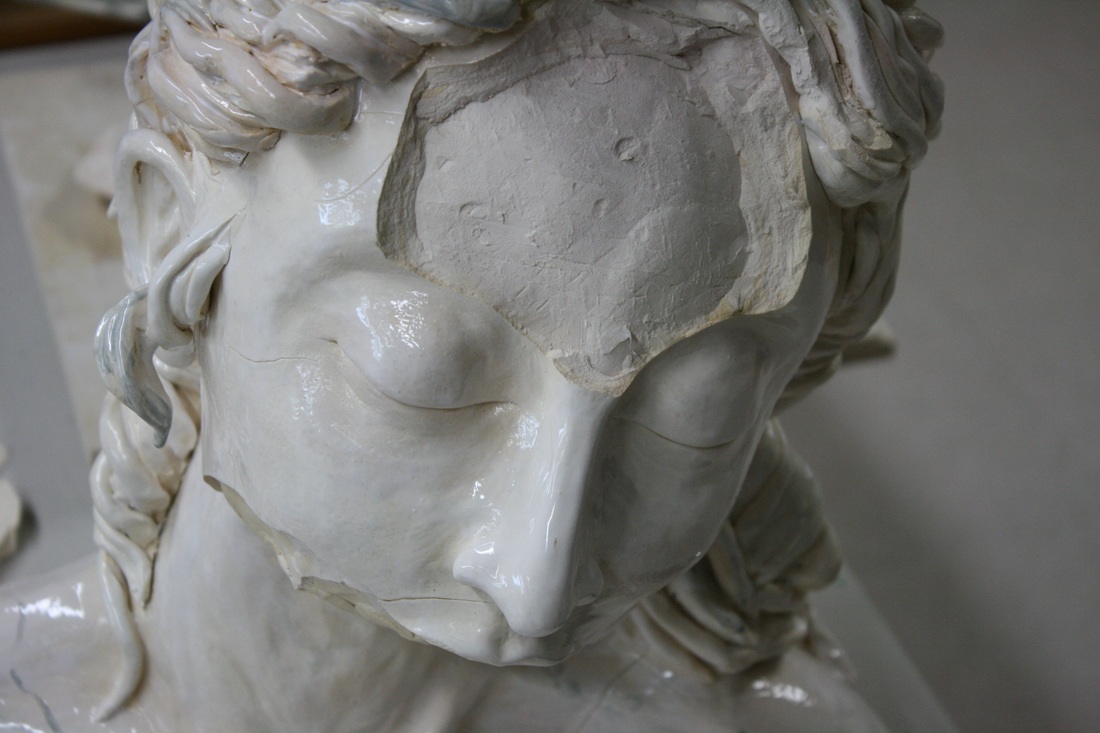
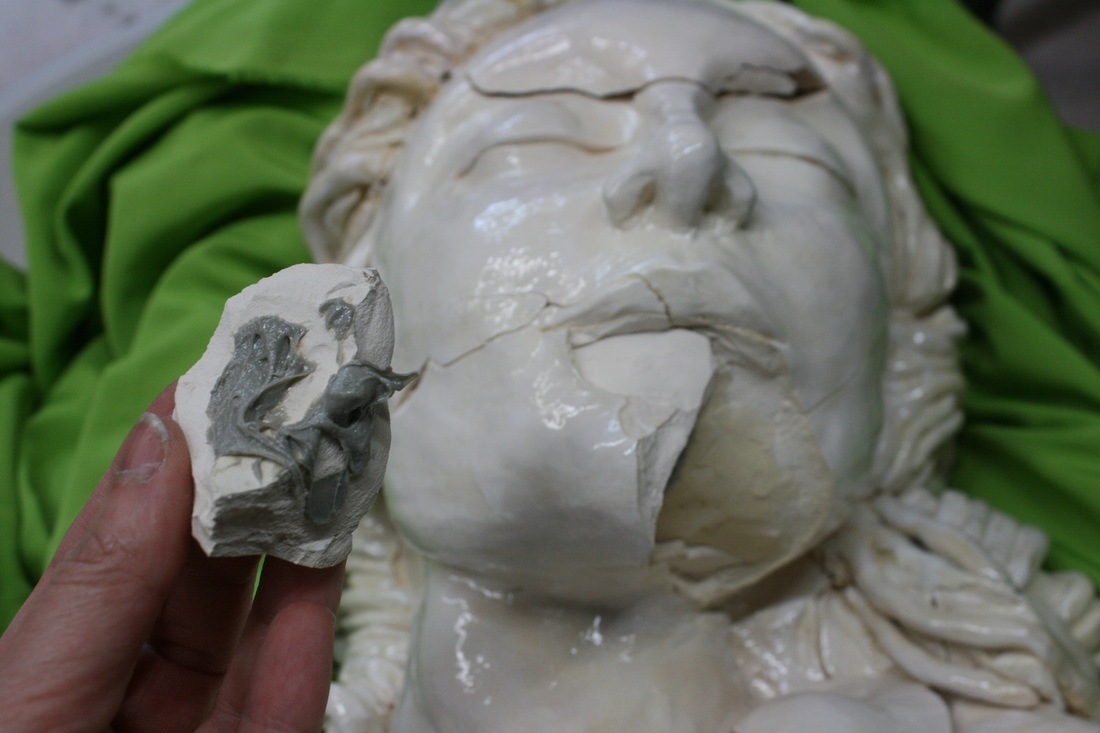
As I took the pieces from the kiln, one thing I realized was, since the piece exploded during firing, the pieces fired separately and... they didn't quite fit together anymore. They bend and crooked and shrunk completely different. Not quite as simple as putting together a vase that cracked on the ground. Also, besides the obvious bigger pieces, I was left with a handful of shards which made no sense and fit nowhere -- or, could really fit anywhere.
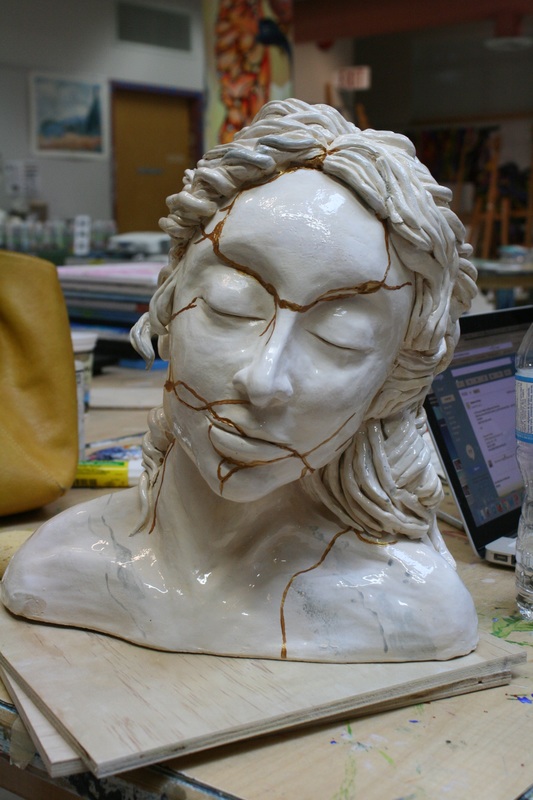
So, the rational part of my brain suggested that I just throw the whole thing in the trash can, and move on to the next project (or, more realistically, to the project of cleaning the art room). But the emotional part of my brain still loved the poor broken statue, particularly after so many days working on her, trying to make her smooth and proportional and give her the right expression. My brain went through the catalogue of things I've seen in art, desperately looking for an answer to my predicament, while a lump formed in my throat... and an image flashed in my mind: a vase fixed with gold. I remember reading about an old technique from Japan: when a vase falls on the ground, instead of disposing of it, they fix it with gold, making the cracks even more prominent. I remembered that by doing this, the object was even more valuable, as it now had a story. I quickly looked online, and it turns out this technique is called Kintsugi. According to Wikipedia, their philosophy states that "part of the history of an object, rather than something to disguise." I had a caulking gun still leftover from my mural project, and a tube of construction-level strength glue (8 times the strength of normal construction glue) so I decided to give this a go. I thought that in the end, I could cover up the cracks partially with golden acrylic paint; I knew the cracks would be huge, but following Kintsugi, I might as well embrace those imperfections.
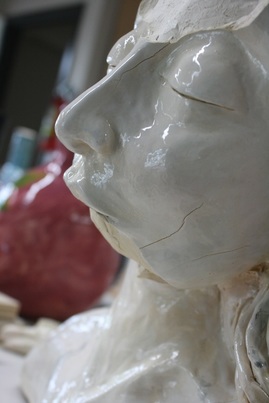
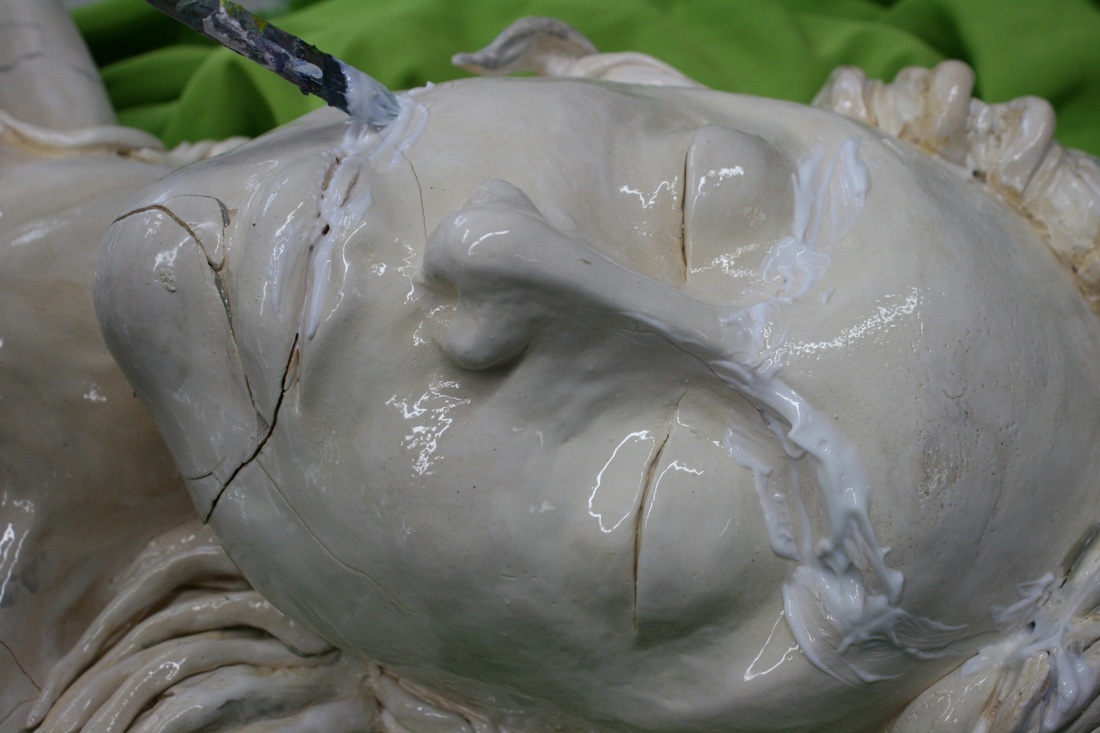
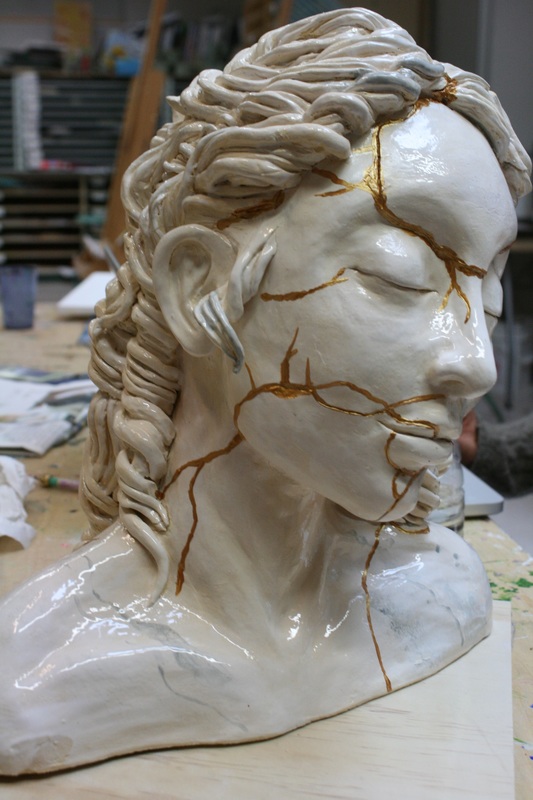
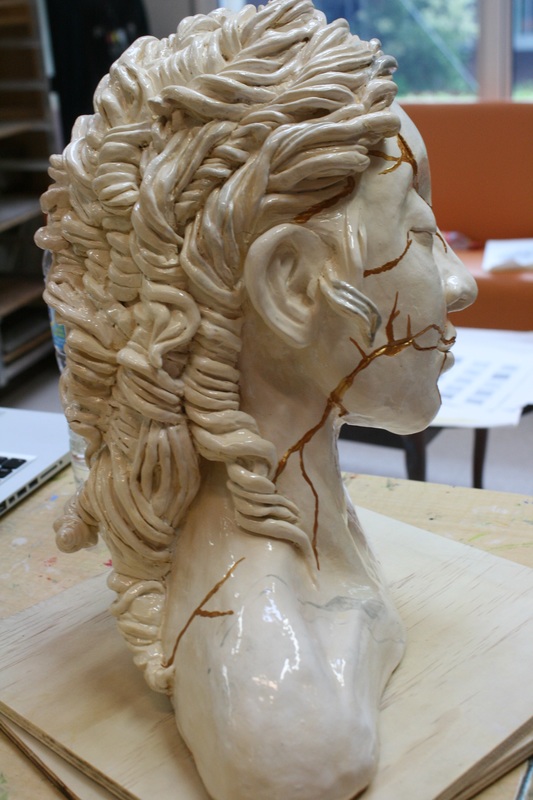
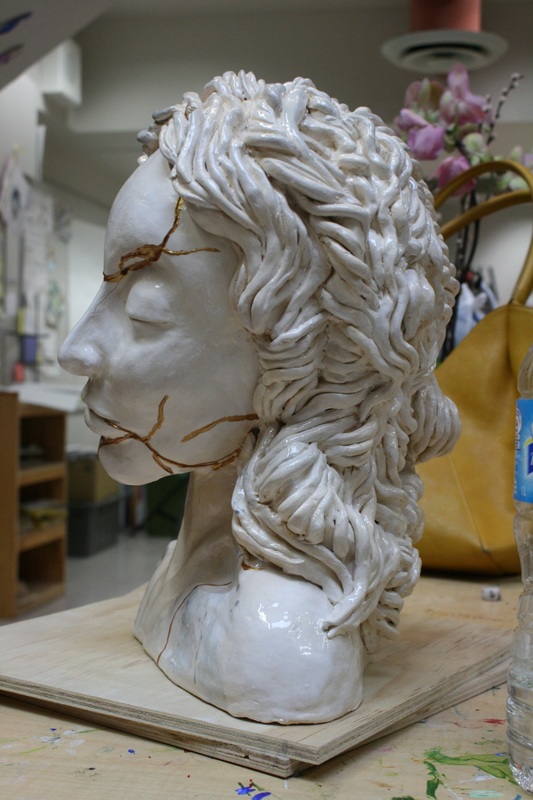
After gluing everything together, I filled the holes with acrylic medium, as well as the cracks. I left the statue drying overnight before proceeding with the restoration process. Below, the final result with the gold paint. I am happy with the results, and think it actually added a lot to her character. It looks intentional now, and the gold paint looks wonderful against the glossy surface of the statue. For now, I am done painting the cracks, but it's such a good effect that I might revisit it next week and add even more cracks to her, in places where she doesn't necessarily need fixing... but to decide where, I want to play with it in Photoshop first before committing.
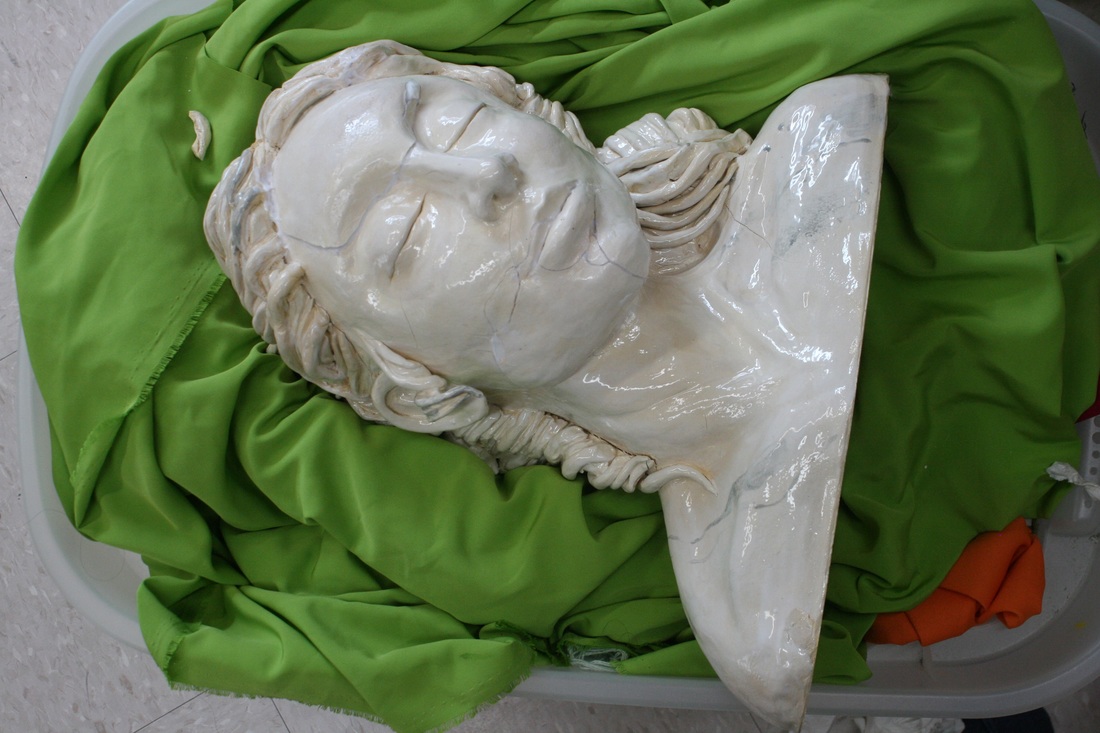
She is now sitting on the shelf above my desk at school. Even though she has all those cracks, she still looks very serene.
Like my daughter said, "Now it looks like she's been around the block a few times." So, it turned out to be a self-portrait after all. ;) I have learned a lot about this process; I am confident that, should I try to do this process again, the statue would not explode in the kiln. I have also learned that sometimes mistakes can allow for even more explorations in art, and that there is a lot one can do to recover a damaged piece. Finally, I have learned a lot about documenting and sharing procedures; as it turns out, I tend to take way less pictures than necessary. I get too enthralled on the process and forget to click the button. For this reason, many steps are missing; thankfully it is documented enough that you can get an idea of the missing parts. In the future, I want to focus on better documenting, so I can provide an even better benefit to others who may be walking the same path.
0 Comments
6/22/2016 0 Comments Fair Dealing / Fair UseWhile searching for the hashtag #copyleft, I found a video about Fair Use (Fair Dealing in Canada). It's by Tara Hunt, and you can see it in its entirety below. After checking out the video, I went to her Youtube account and found several videos that sounds extremely good to watch... a lot about Social Media and spreading information. I subscribed to her so I can come back later... if you want to do the same, you can do it here. According to Fair Dealing, using others' intellectual products in our work is legal under certain circumstances, even without permission. This includes video clips. There are a few rules to follow, but basically, we can reuse these bits as long as it is used for education (Wooo Hoo), research, parody, a review, satire, criticism and private studies, and as long as we don't use more than 10% of the copyrighted material in our work.
I think the whole point is the purpose of the modified videos you produce -- as long as you don't make money directly, you are ok. In fact, it's even OK to monetize the video if you are a small fish; but the bigger the distribution and profit, the more likely it would be for the material to fall outside of fair use, because one of the criteria, which is probably the most important, is -- by using the material, are we somehow taking profits from the original copyright owner? If all you do is get little clips of copyrighted material (less than 10% of the original work) and blend these with your own work, then you would probably fall under the fair dealing category. In fact, I would agree with Tara when she says that this would probably affect the copyright owner positively, as people may like the little clip so much, they may look for the whole video. After checking out copyleft and understanding a little more the difference between something that is copyrighted and something that is part of the creative commons, I found this little video helpful in helping me walk the blurry line between copyright infringement and fair use as an educator. :) 6/22/2016 0 Comments Knowledge as a Common Good
I like the idea shared by R3D on his article "Authors' rights are broken -- but we can fix them" (it's in Spanish). It makes a great point for sharing knowledge by stating that there are two kinds of knowledge: the knowledge as pie and the knowledge as recipe. Imagine the owner of a pie shop; he makes a few pies a day, and these benefit a few people. He keeps his recipe under lock and key; when he dies, his recipe is lost forever, and so that knowledge is also lost. But what if the owner of the pie shop decided to share his recipe? New recipes with modified ingredients would soon appear, as the body of knowledge built upon the previous knowledge, thus growing the knowledge base of the people.  It works pretty much the same way with copyrighted material. When an author copyrights material, he is limiting access to the material to only a few people who pay for it; the "recipe" is locked away under copyright law, and there isn't much that can be done about it (besides using bits and pieces of the pie under fair use). The copyright in Canada, for instance, is life plus 50 years after -- which means that by the time the copyright is over, people may have forgotten about the pie altogether. As educators and authors of content, we can ensure that knowledge continues to grow by making the material available through a Creative Commons License. Engines such as Google Images, Youtube, Flickr and others, all have the option to make the material fall under a Creative Commons License -- and you can decide how the License is to be used. So, if you have a video or a book, there are ways to make these products licensed under CC; and if you make a website, for instance, you can add a CC license to the whole thing by getting a link here. Finally, we can also search for CC material by following this link.  Still, while as an educator, it is great to be able to publish and access CC items for our use, it is difficult to see how someone who makes a living out of producing intellectual property could be blamed for wanting to copyright their material. In this case, I see a painting or a design a little bit like a pie; if the pie shop owner can't sell his pies, and that is how he makes his money, then how can he survive? As educators, there is a murky line between what should be shared, such as best practices for education and ideas for lesson plans, and what could be potentially something that an educator charges for -- such as books detailing years of research, visual aides and new methods of teaching. I believe that waiting 50 years after the death of the author is not feasible or relevant, but that it should be up to the content creator to share their work under CC if and when they feel like the pies they sold have made them some money to live.  One last thought. We are at a strange crossroads in terms of knowledge; we have built our own Alexandria library on the cloud, and while we may think that the internet is indestructible, the reality is that it is a very tenuous thing, relying on electricity, servers and manpower. Our reliance on this method of saving knowledge alone is probably not a great thing for future generations. In case of a global calamity where electricity is lost, we would suddenly have no access to the Internet, and the few people who carry the knowledge would be extremely important. Perhaps this is something to think about -- how can we save our recipes for the future in a way that they can't be easily destroyed? Knowledge is our most important asset, and finding a way to reliably keep it and build upon it should be a priority for everyone.
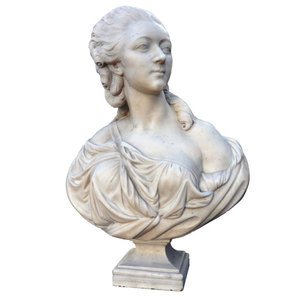
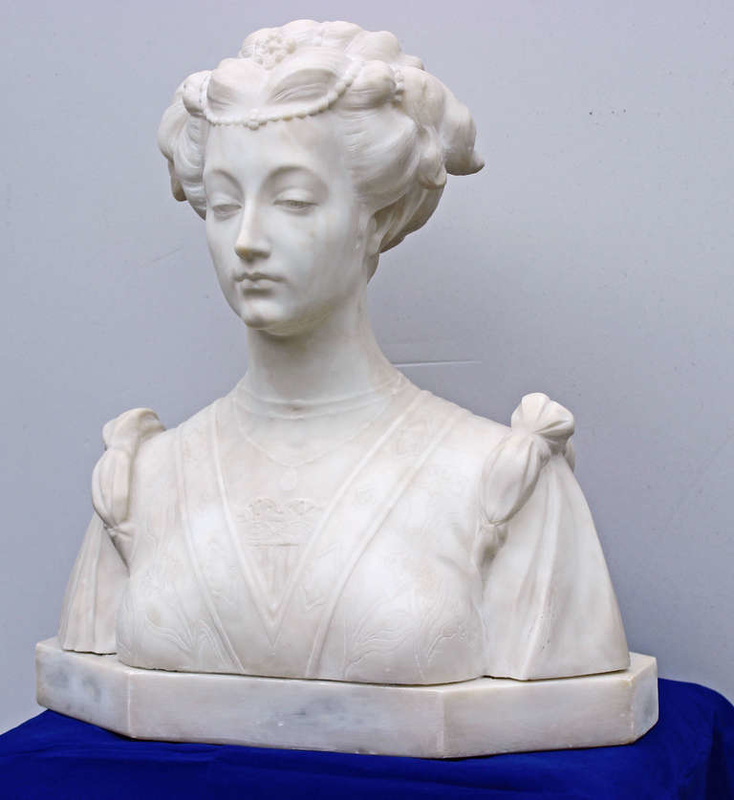
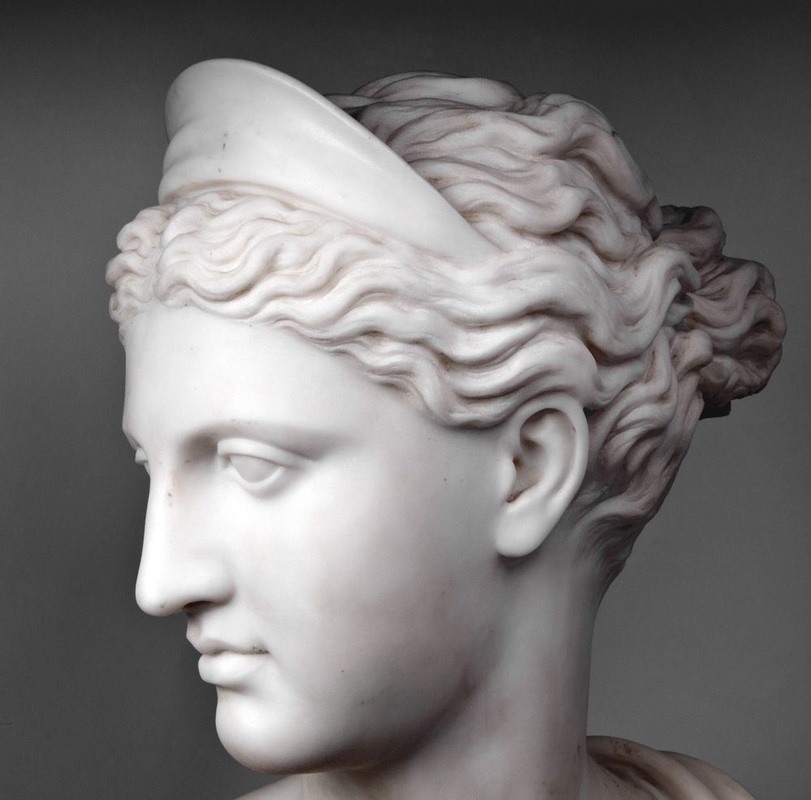
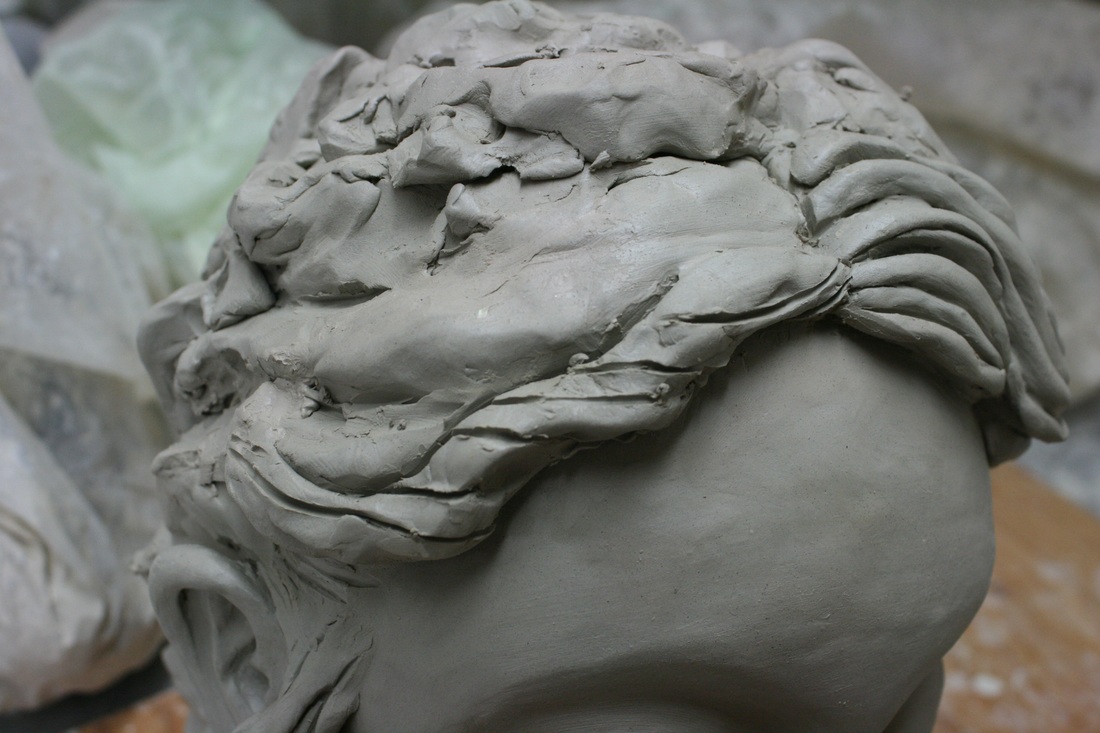
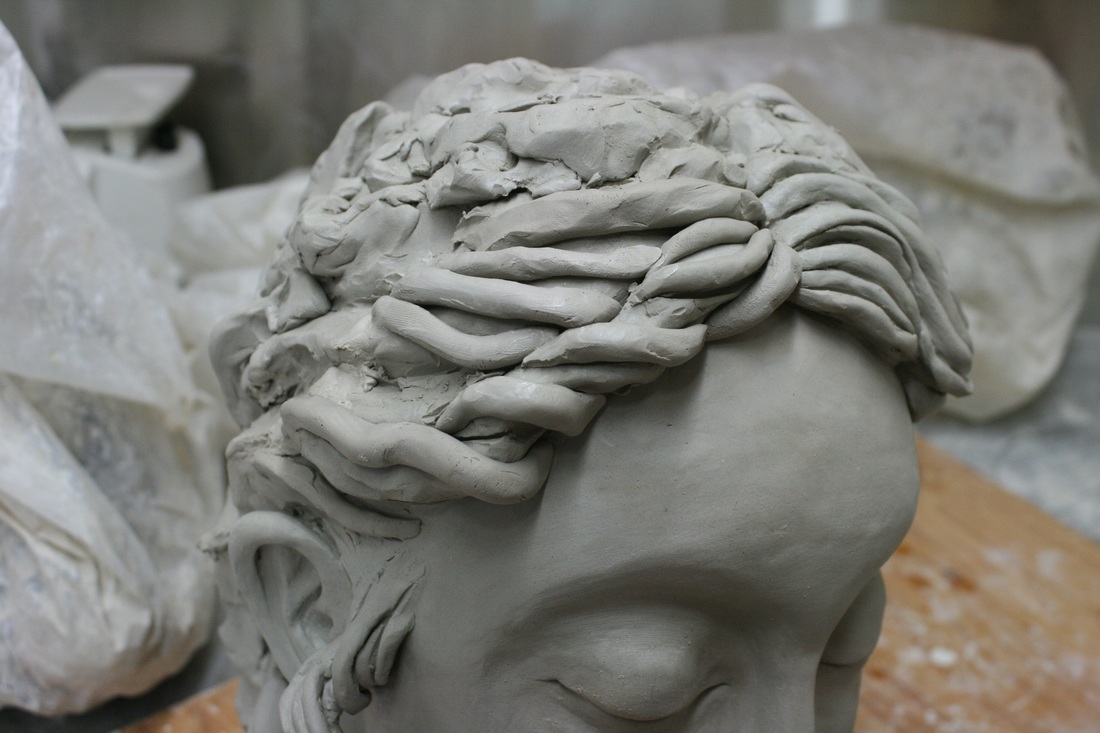
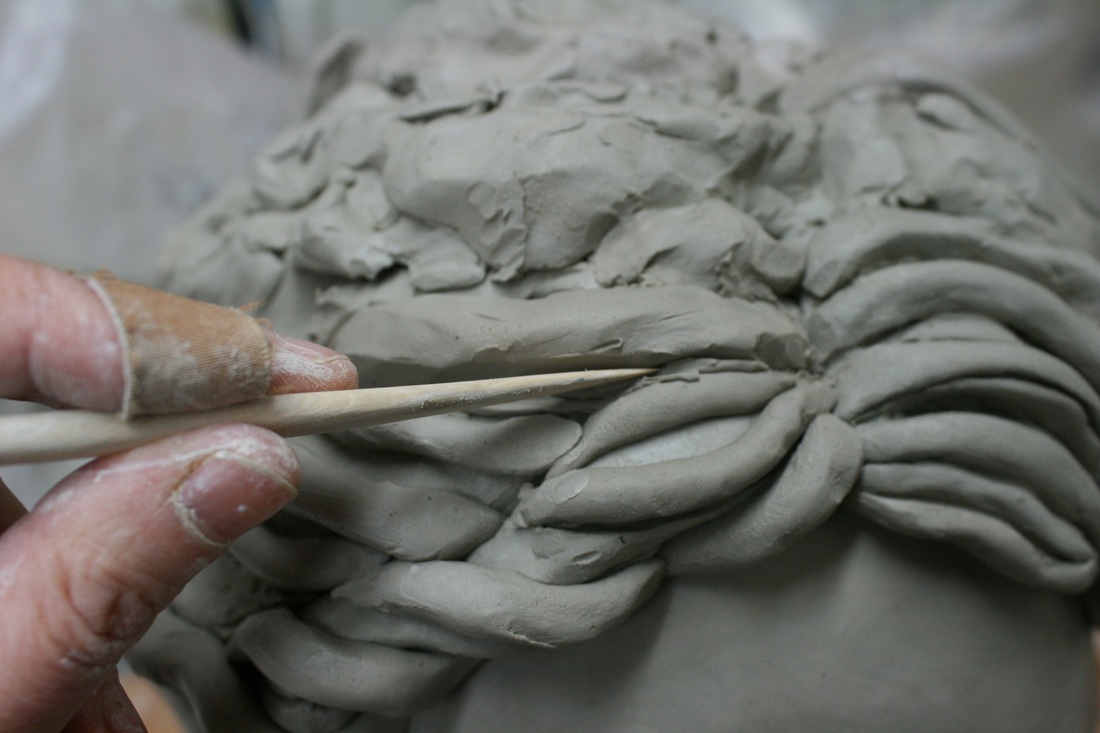
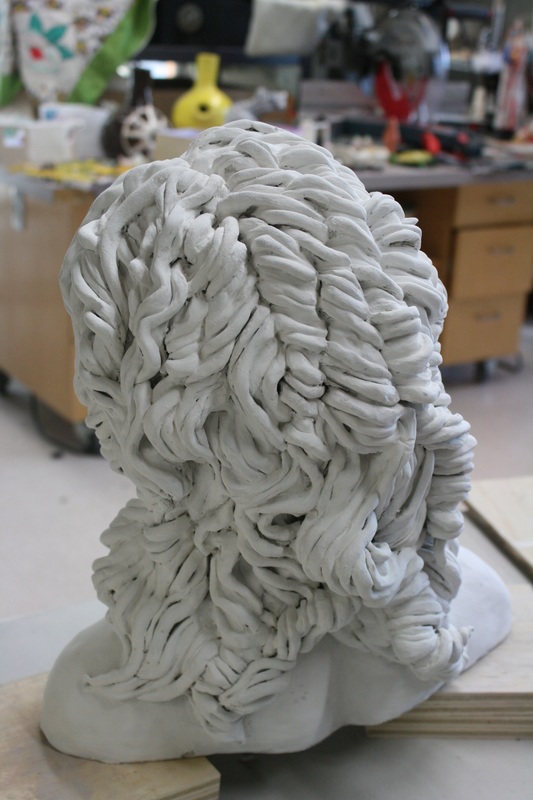
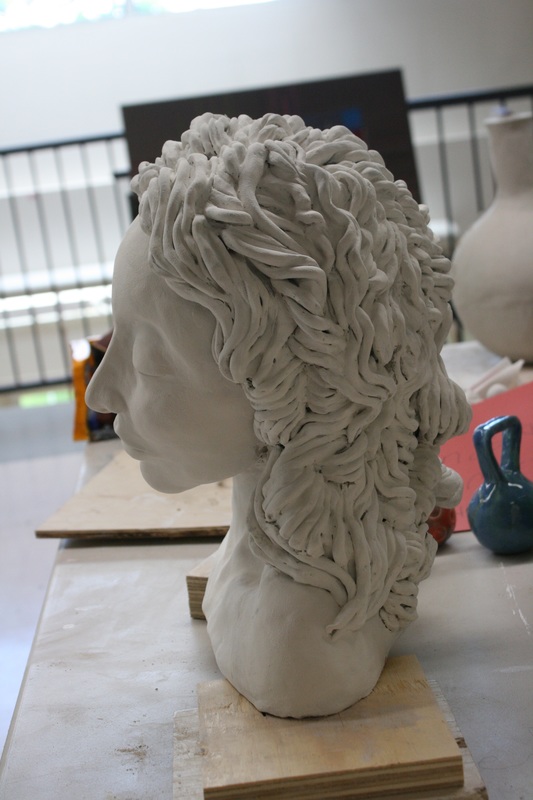
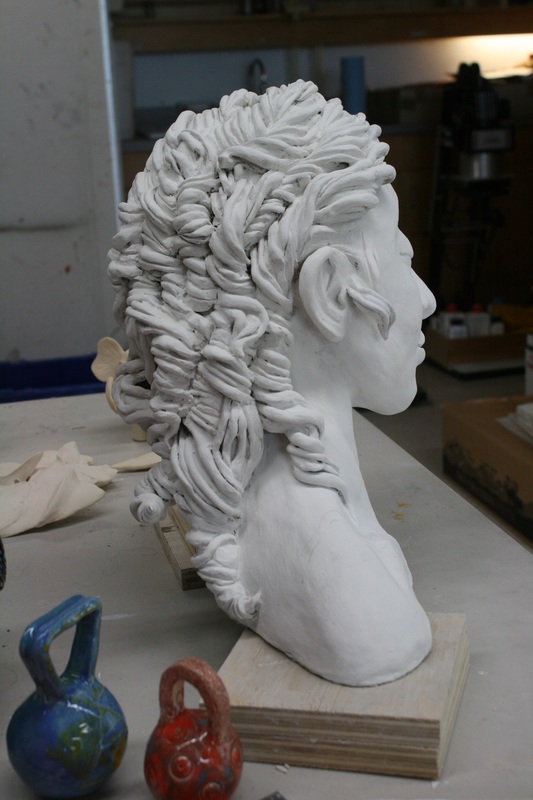
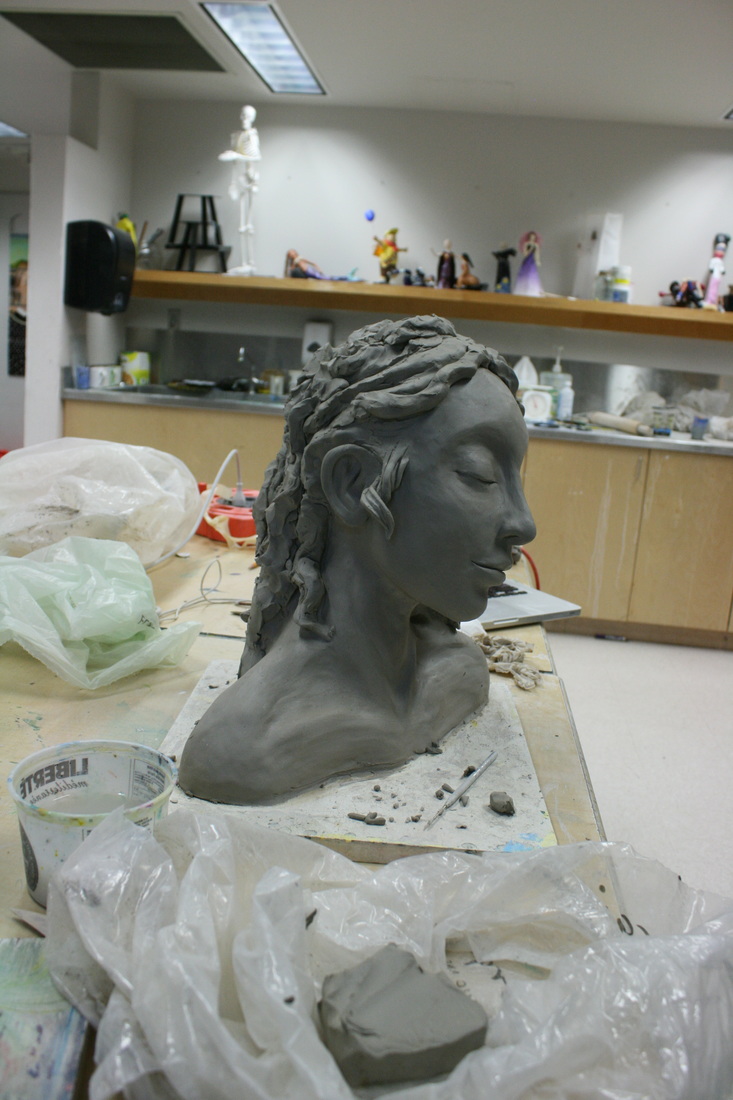
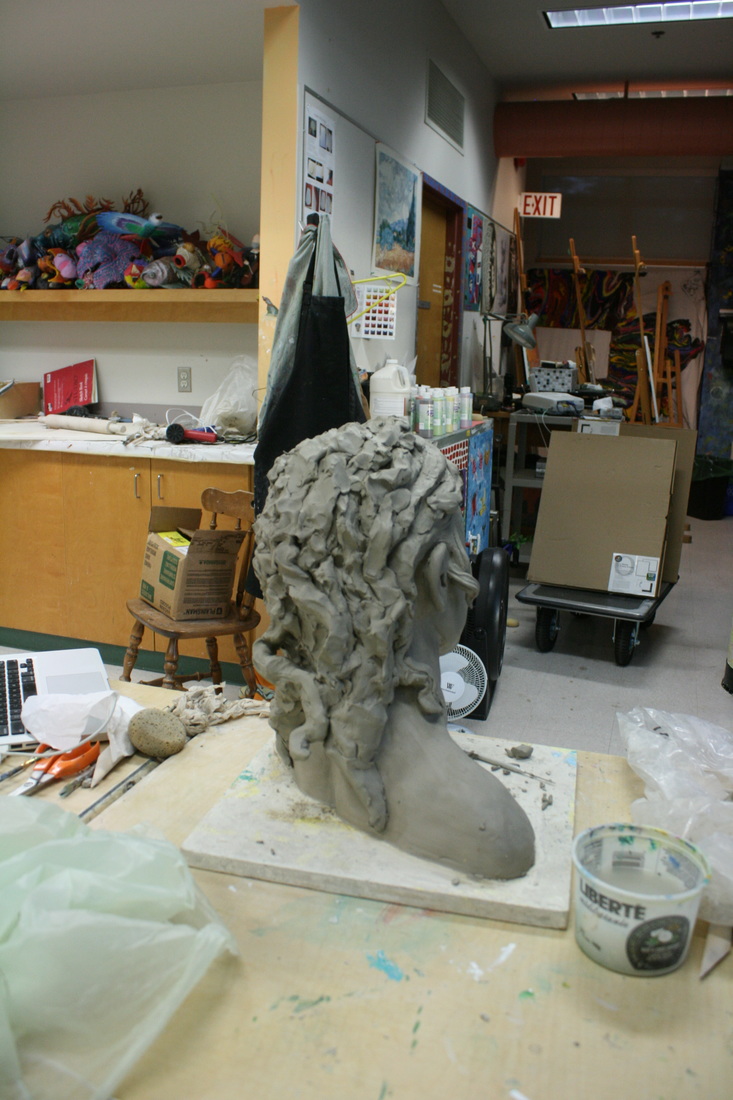
After completing the hollowing of my bust, I left it alone for a couple of days as I wrapped my head around how I was going to deal with the hair. Part of me wanted to do it more realistic, and part of me wanted to do it more stylized. I looked at some pictures online to help me decide. Here are some marble busts with realistic hair: As you can see, the style is not well defined, making the surface look very soft, like actual hair. This would have been the easiest route -- after all, I was almost there already with my "twisty glom" style of hair. But I thought that maybe it would be fun to try something a little harder and more time-consuming, something that would have a little more fun to it, and be a little closer to my own style. So, I looked at more pictures, and found this kind of style which was very common on older, Classical Greek styles of sculpting: So, I decided to go for it, and try my hand at creating a stylized curly hair with clay. I didn't know how to start, so I decided to just copy the way the marble hair style was done. If you look at the hair, it looks as if it is divided in sections; so, I divided my hair in sections, and worked curl by curl. I first decided what was the general way that each curl's hair was going to follow; then, I made little coils out of clauy, scored them and scored the head, and attached these cois on the hair. But not on every line! I followed a "do one skip one" pattern, adding more dimention to the hair this way.
To ensure each curl became part of the whole head, I worked with my tools and pressed each side of the coil, on its whole length, so that it would attach really well. I also cut some of the coils in half, creating thinner strands of hair. I think this really added differences and interest to the hair. Finally, I sometimes added two coils together and then skipped a space; in other words, I did this very unevenly, based on what looked good and what felt most uneven and messy.
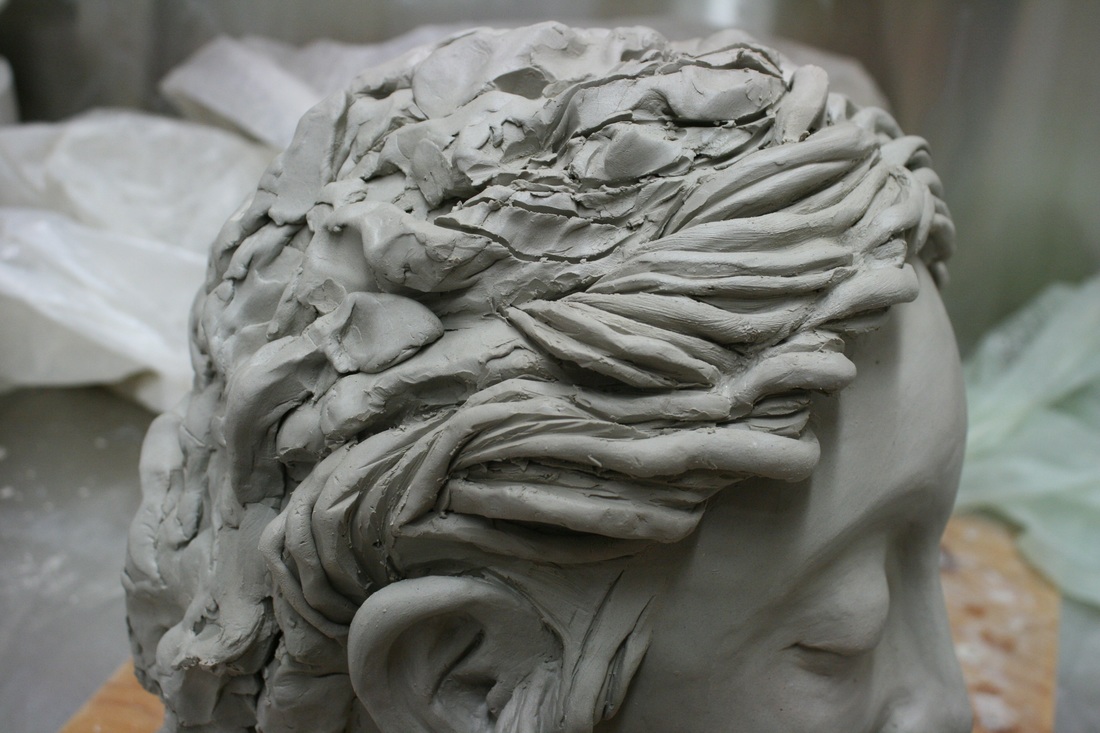
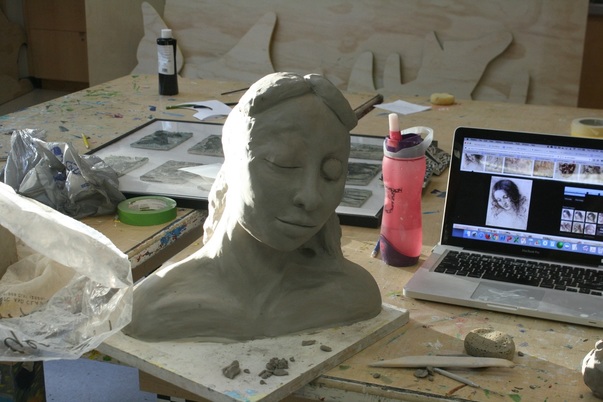
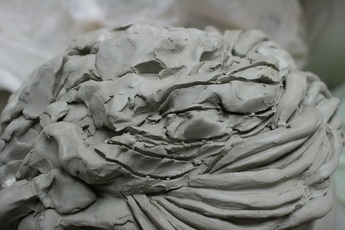 This is the result of all my work. It took me a few days to finish, and it was very fiddly, but it was worth it, in my opinion. I can't imagine how hard it is to create this effect in marble! I like how uneven and messy it looks, and how some areas have so mjuch more volume than others, just like real hair. If I had to do it again, I would change some things... I would like to make the curl effect a little less obvious. Maybe find a middle ground between realistic and stylized. But I am happy with my first attempt. I was afraid the strands were going to dry faster and end up detaching from the statue, so I painted the whole thing and bagged it to dry really slowly. After a week of drying in a bag, I removed the bag and left it drying on the open air.
I think all in all she turned out looking good. She has been drying for a couple of weeks outside now, and it is time to finally fire her. I don't want to fire her, though! I am so afraid she will explode. If she does, these are the only photos I have of her... this makes me very nervous. But not firing her means that she will forever be brittle and delicate; already, she has a chip on her right shoulder from moving her to this location (I covered it with paint, but it is still a little noticeable on the leftmost photo below).
All I can do right now is fire it and see what happens. Wish me luck, everyone... tomorrow is the day. The good thing is, now I know I can do another one! But let's be positive -- maybe she will be fine!
6/19/2016 0 Comments Workflow - Ideal versus RealityAfter checking out Dean Shareski's video, Sharing - a Moral Imperative, I began to understand more the core importance of sharing our work as educators. Small things, such as lesson plans and material we use to help students understand a certain subject, can be extremely helpful to other teachers. I loved the math video series by Dan Meyer, and how he shared his video series through his blog. I liked his ideas so much, I am now following him on Twitter... which means I now have one more awesome resource which I won't have time to read. Looking at my own current workflow as an educator (below), I find that I have not yet found my footing, or my groove. Things have been happening very fast, and there is so much -- SO much I want to read and learn -- that it frustrates me to no end when I see days and weeks and months going by, and still not being able to organize the little time I have and actually use these resources. Due to my lack of time, health and energy, I find that my line of judgment regarding resources -- both made by me, or other people -- is that they must be extraordinary in order to propel a response from me. That's a really tall order, and really bad in the long run. If I create a project, I look at the resources, and if it is not extraordinary, I don't waste the little time I have with cataloguing and documenting the process. I save the idea, and take a few pictures, and keep it on my Dropbox for a day in the future when I have the time to revisit it and spice it up. Worse, when I make something that is extraordinary, and document it and save it, I only share it with other educators (through Twitter or Facebook) if it looks good enough, based on my own idea of what is aesthetically pleasing or not. In other words, I am a visual snob with my own things, kicking my poor little projects under the rug when they are not perfectly polished. If I discover something online, or find a good link with information, I only really read it if it can be done in a couple of minutes; otherwise, I find myself saving the bookmark for later, when I know perfectly well that I don't ever look at them afterwards. I guess hope springs eternal. I think the most frustrating is when I find a good tool to use, that would possibly save me time and help me become more organized... and then I just save the link on a folder in Dropbox and never see it again. I want to be so much better than this! 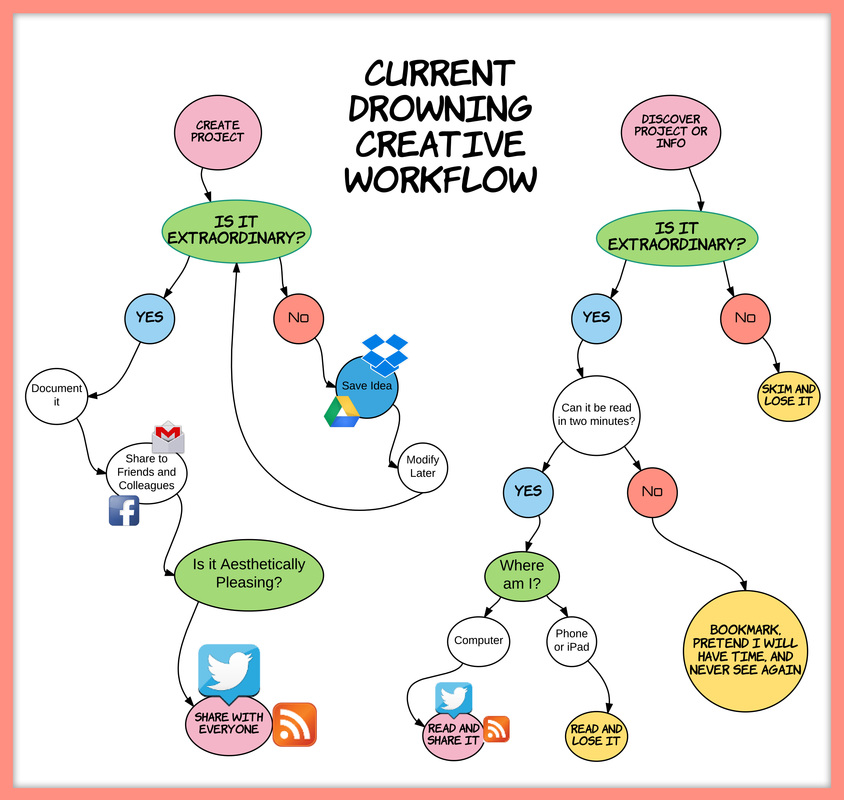 Thinking of what a perfect workflow groove would look like for me, I came up with the simplified chart below. Instead of considering if something is extraordinary or not when I create a project, I analyze if it engaged students in some way, and if so, then ideally everything that gets documented is then shared. Also, if something is not engaging, then I would look online for ideas, and if I found something that I could merge with my original project, I would use this to instruct my practice and change the project into something better. Also, when it comes to info or projects I discover online, I would like to save it first and foremost. I checked out some tools that can be used for this purpose, such as Diigo, Pocket, Evernotes and Pinterest -- I haven't used any of these properly, not even Pinterest. Getting used to these tools would make a huge difference for me. Having these available on my phone and iPad also would help me save anything that is valuable for later use (which I currently don't do). 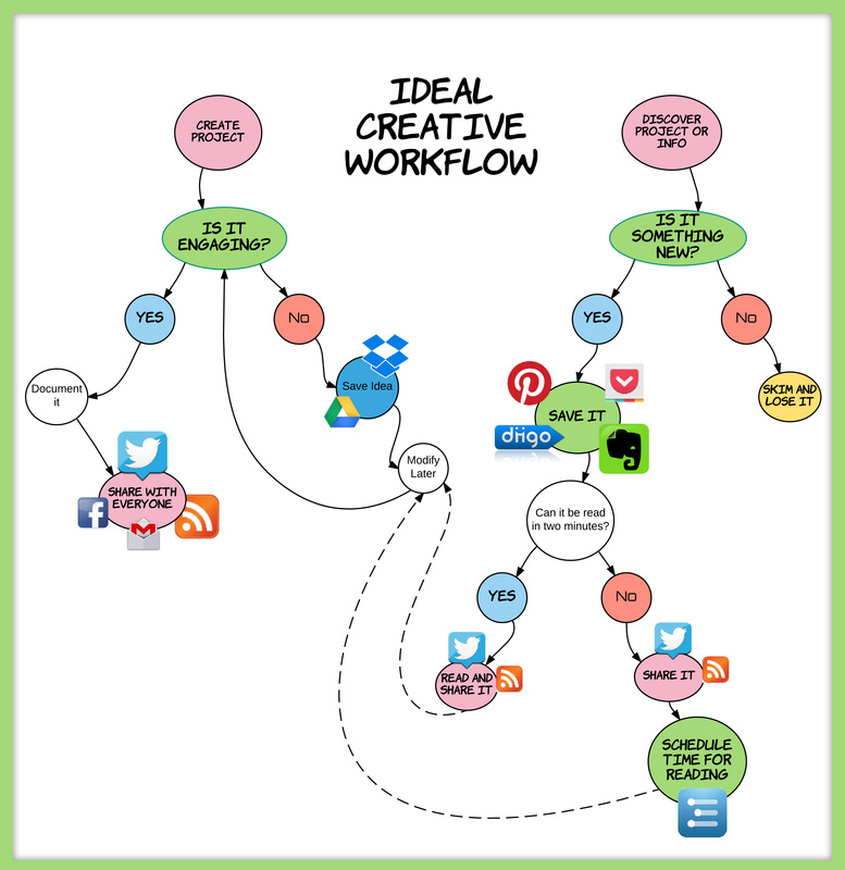 It all comes down to organization and confidence. Organization will allow me to save projects and links I find, and actually be able to share them. Confidence (which hopefully will come with time -- this is just my first year teaching) will allow me to share everything I make without worrying if it looks pristine or perfect. If all of us educators share everything we make, then we are getting one step closer to making our knowledge a unified force, with good practices bringing change everywhere, and education in itself improving by leaps and bounds.
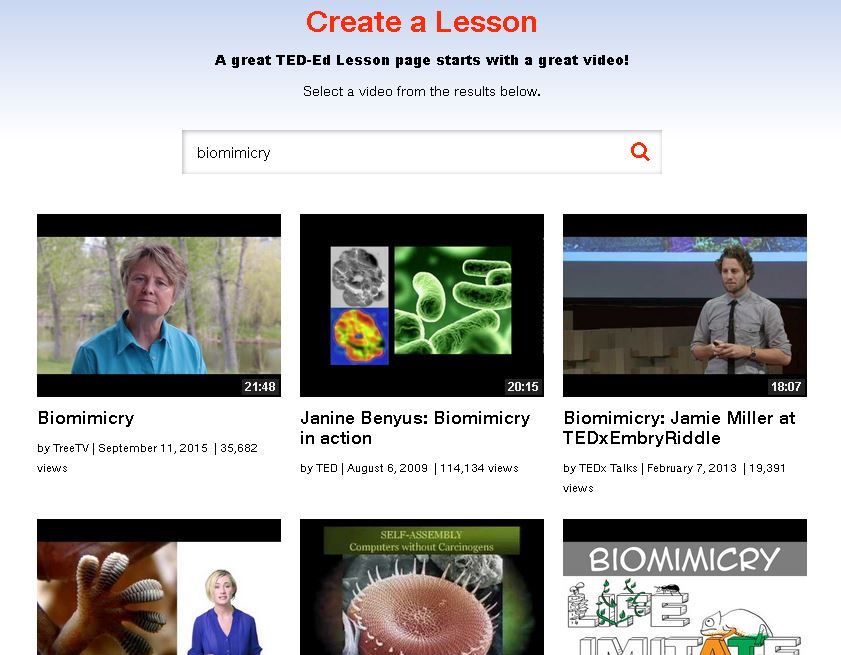
Sidenote: I created these graphics using Lucid Chart; it is extremely intuitive and easy to use, with features including docked arrows that move organically as you move your bubbles. It comes with a 7-day free trial. After the 7-day trial, the basic price is $4.95 monthly, which would be great if all I did was use charts, but not for something I would only use once in a while... sigh. After I finished my charts, my husband pointed out Gliffy, which is an older competitor to Lucid Chart. While the paid version is $3.99 a month, there is a free account option, and while it doesn't let you save, you can simply finish your chart and take a screen capture of it. I tried Gliffy out and found it harder than Lucid Chart, but it is still a considerably free option. Still fussing over Lucid Chart, I did a search on Google for Lucid Chart Education, and found a link which allows for teachers to request a free upgrade to their account. This is very exciting! I changed my email to my school email and did my request... hopefully this will be upgraded soon. For our third week on 505, we were encouraged to take a closer look at an OER and analyze it as a resource for educators. I decided to try using Ted Ed and see how easy it was to use and navigate. The site offers a large, very visual slideshow in the middle area, with links to the lessons created by other educators around Ted Ed videos. It also displays arrows on both sides so you can move from lesson to lesson. If you scroll down, you can subscribe to the page, which can be good as you can get updates on new lessons and ideas. The very first thing I noticed on the site, however, was their "call to action" button, inviting the teacher visiting the site to create a lesson.  I decided to give it a go, and create my own lesson. When you follow the link, you are taken to a different page, which asks you to type a keyword or a Youtube link. Right below, you can see this box: 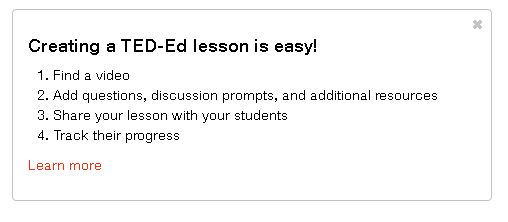 Wait a minute. Track their progress? I am most intrigued. I decided to pick a subject that is interesting to me and that I will be using next year: Biomimicry. I was surprised to see all the videos that were available to choose from.
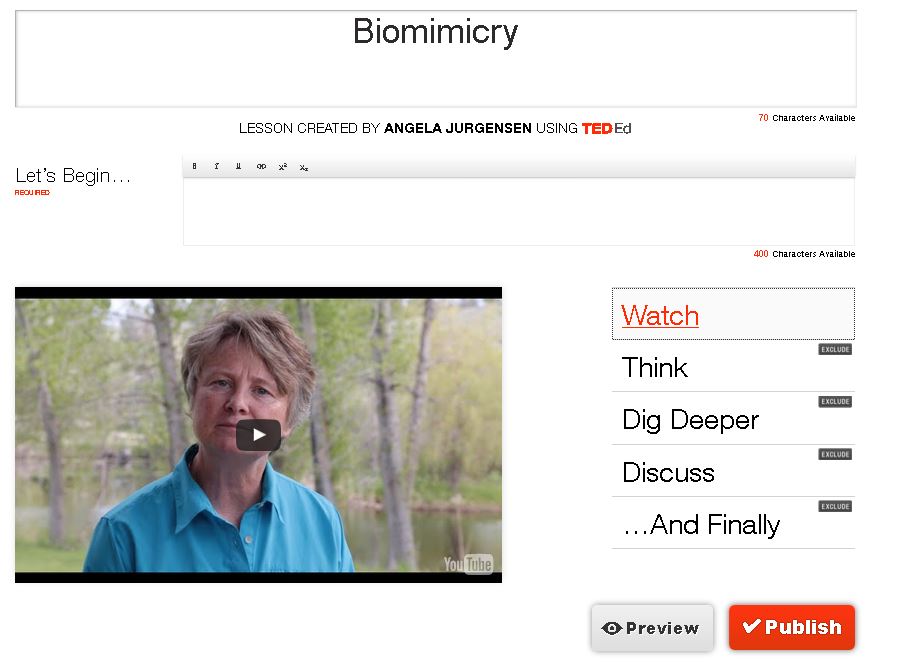
Once I selected my video, however, the site asked me to log in or register; usually this process takes time, but with more and more sites allowing for Facebook login, I was back looking at the video in no time. I previewed part of the video and decided to continue with it; clicking on the "continue" button took me to a lesson creator tool.
So far, the experience at Ted Ed OER had been pretty smooth, but this page takes the cake. As it turns out, you can plan a whole lesson for your students to work on individually, and respond to, all on their own. This lesson creator offers five sections, which can be customized or omitted. "Watch" allows for the student to watch the video; "Think" allows for the teacher to create multiple choice questions as well as open answer questions, bringing a level of response and interactivity. "Dig deeper" is an area where you can bring points that would not otherwise be thought of, and that force the student to think beyond the subject viewed; this would be a good place to add "what if" questions, or otherwise engage the students in a deeper thought process. Under the "Discuss" link, the teacher can create discussion boards about the lesson, and so the students can interact with one another and debate what they have learned. The last link, "And Finally", offers the opportunity for the teacher to conclude the learning session, leaving with the students a few last thoughts to consider. I easily created two questions for my students; one, an open-ended question. The second question was multiple choice. I was happy to see that they offer students a hint button, in which they can see the exact second where the question was answered in the video; this makes students less likely to become frustrated, as they would not need to watch the video again if they didn't remember the right answer.
I absolutely love this lesson planner idea. This is an excellent way to get students individually engaged on the subject at their own pace, as well as building community around this subject with other students through the discussion link. I also love how this can be used as easily in an online course setting as in the classroom; when building a course online, every one of these tools come in really handy, but as a classroom teacher, I also see the benefit this brings to day-to-day course delivery. Ted Ed lesson creator transforms the usual watch videos-produce response to a more personalized experience. Finally, the ability to easily look through other teachers' lessons, as well as share my own, is really inspiring.  I love sharing information with other teachers, and theoretically understand how beneficial it is for us to unite and make it easy for others to find the nuggets we come up with along our teaching path. But even though I make an effort to organize and catalogue projects and ideas, I find I don't tweet about it, or share those ideas with others on a broader sense. I say that I like my ideas enough, but I don't post them on places where people will actually find them. I post them on Facebook, where I have a handful of friends who are teachers, but I still find hard to blog about it, tweet about it or otherwise make these projects public. So, on one hand, I love these ideas enough to organize and catalogue, but maybe not enough to share. The thing, I think, I keep forgetting -- and many of us do as well -- is that not all of our ideas have to be clear winners, and not every project has to be super amazing. If someone looks at one lesson plan and feels inspired to use a small portion of our idea on their next lesson, then that's already a great help. What may not be excellent for us, may be exactly what someone needs to spice things up in their classroom, virtual or otherwise. And for teachers like me, this Ted Ed platform offers a great way to get started offering ideas to a broader audience. 5/26/2016 7 Comments Teachers and Sharing InformationThere is no contest that we are living in the golden age of teaching. We have so much at our disposal to enrich and engage our students; from current videos posted on Youtube, to free programs that allow students to create content, to lesson plan and idea banks for teachers, it's never been easier to be creative and look like a champ in the classroom. But this new age of information accessibility raises a series of important questions.
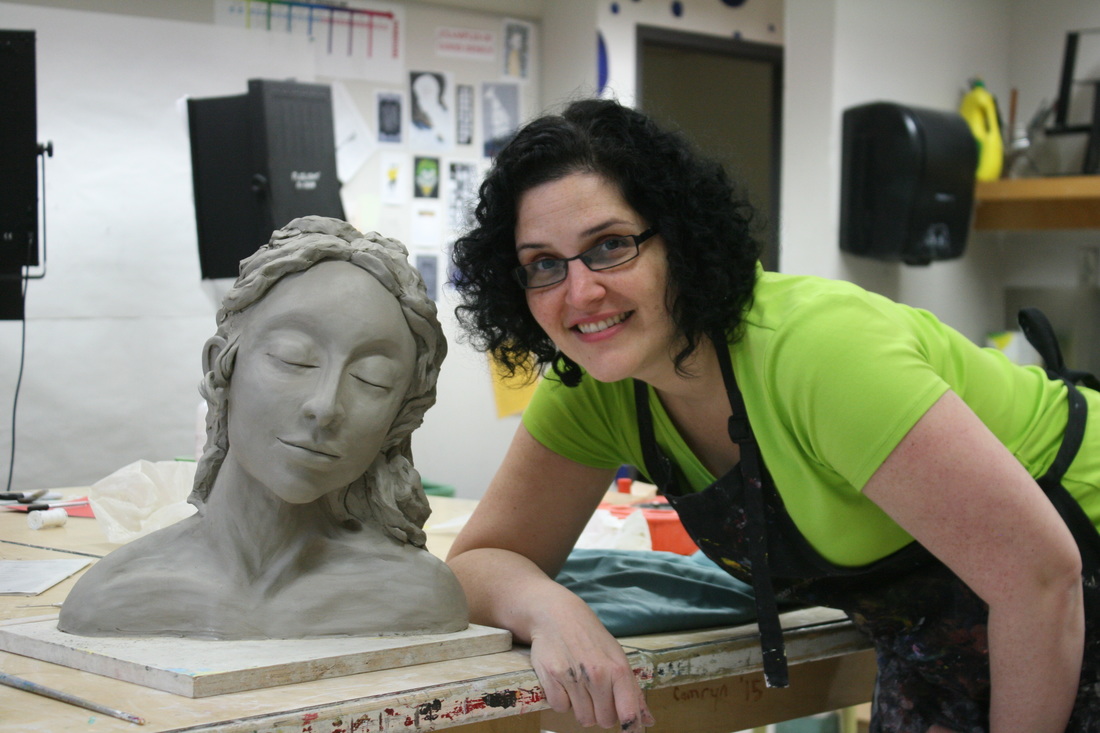
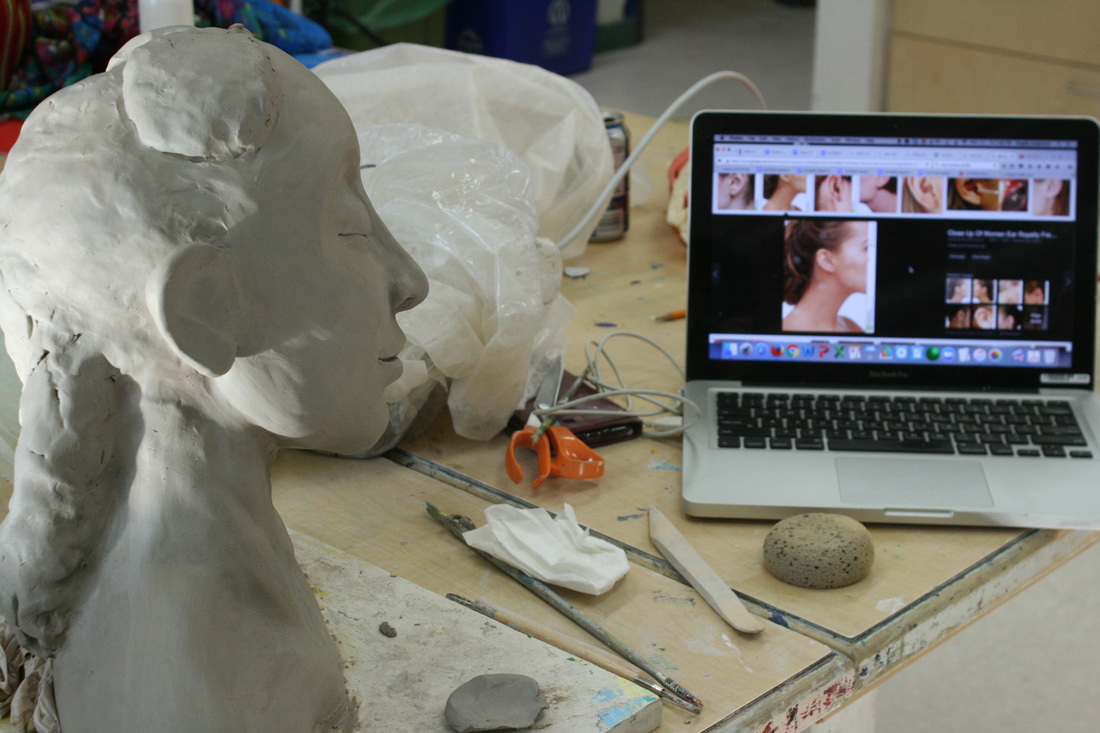
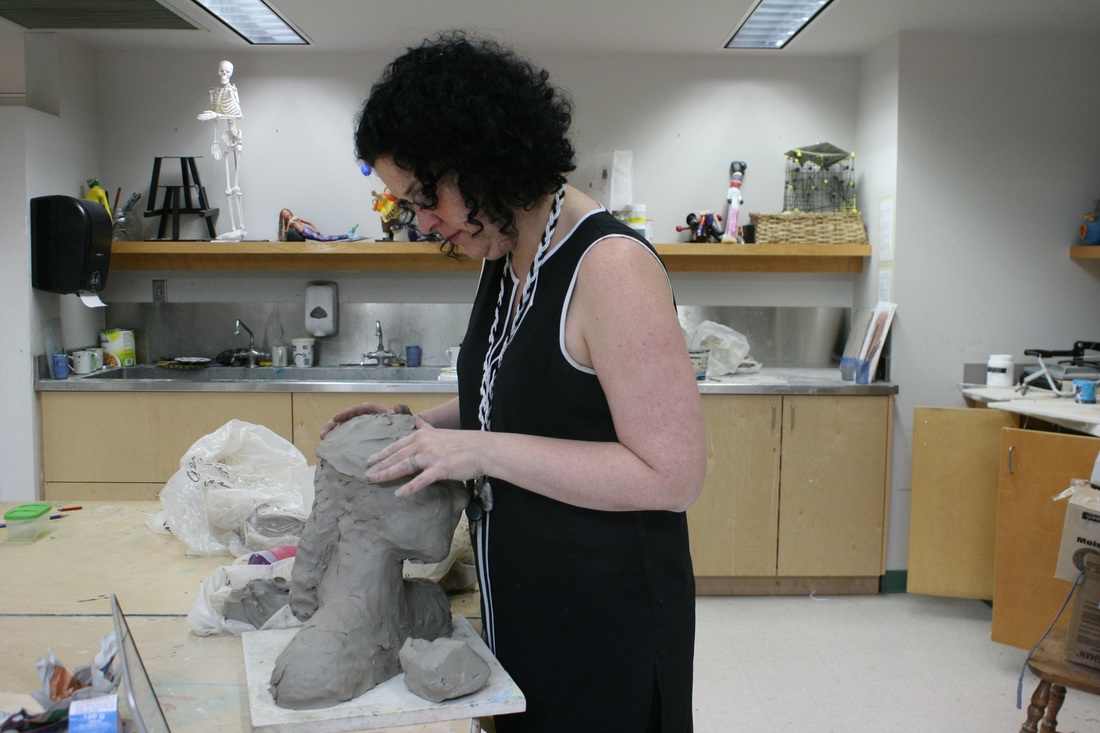
First, who should own the material created by a teacher to use in their classroom? Unfortunately, big corporations have set a precedent years ago that make it legal to take ownership of any ideas that were developed during the years a person worked at a certain company. Following suit, many school districts claim ownership to any material a teacher created during their work for the district. While this may seem legit, since other companies have been doing it for a long time, the reality is, this is not logical or right. Being involved with the high tech world in one of my past lives, I have heard of stories of engineers who had amazing ideas while working on a certain company, but had to bide their time and wait one or two years after leaving a company before following a certain idea they had, as their contract covered not only the ideas they had during the time they were in the company, but anything after a year or two after that time, as long as the idea was somehow related to the work they were doing -- which, being engineers working on technology, it most likely was. The inhumanity of these practices always baffles me. When companies (or school districts) hire us, they are hiring us because they see a set of traits and qualities which will benefit their company somehow. These are inner traits, ideas and point of view that were developed over a lifetime, and should belong to the worker and the worker alone; the money that is paid as a salary to this worker could never be enough to pay for the incredible wealth of gathered and collected data, insight and experiences this worker gathered throughout their lives. It should be impossible for someone to own my ideas while I work for them, during any particular time. It would be like owning a piece of my soul. The ideas I have right now while performing my function as a teacher are unique and sparked not only from my direct work, but from everything I have lived and seen and experienced throughout my lifetime, and no company should be able to own this ethereal part of me. But somehow, a long time ago, when people were seen only as bodies to be owned, this was acceptable, and we have yet to catch up and force the rules to change; we have yet to wake up and state, enough. Don't get me wrong. I am all for sharing my ideas, my lesson plans, the way I do things, with other teachers; I have several sites with how-to information and examples of work, going into detailed minutia and making it easier for anyone to do what I do. On the bottom of my sites, I state, "Take it, it's free" or something to that effect. I want kids to have great experiences everywhere, and if something works for me, I really want to share it free of charge. But it is my choice to share; it is my choice to make this material available for free. It should always be my choice. As an artist as well as a teacher, there are some things that I would rather share for a profit. Again, my ideas, my choice. For instance, I have made some posters for the Elements of Art which are really good; I intend on eventually making another set, with the Principles of Art. I also have developed cool posters for science, neat designs and games for education and other things that took me several full days to develop. Did I have to do this amount of work for my students? No; I do these things because it is my passion as an artist. In the end, if it turns out looking excellent, and if I want to sell these items, as an artist, I should be able to sell this in sites such as Teacher Pay Teachers. I had heard about this site before, and even have purchased a couple of fun things from it (couldn't help it!). The idea that my money was going towards another teacher made me happy. After reading through this blog post, and checking out the comments, I had to reevaluate my thinking regarding what a teacher is and does. Every person who loves his or her craft, and works hard to come up with unique ways of seeing a certain subject, is an artist. This includes teachers. As an artist, every teacher should have the choice to either give their art for free, or be paid for their art, and they should not be shamed for trying to be paid for their work simply because they should "do it for free if they love it". Musicians like playing music; would you ask a musician to come and play for free, simply because they love it so much? Even if they have a solid gig on a bar that pays for all their bills, would you resent him or her for charging for their CDs and having pride on the creative aspect of their work, and for wanting to be compensated? Would you ask an artist to give away paintings for free, because they have so many anyways? Would you call them greedy if they didn't? If we expand on this, every person who loves and enjoys her or his profession -- be it a doctor, a dentist or an engineer, or a teacher -- could be shamed into working for free. Many of these professions do work for free sometimes, but it's on their own terms -- by the same token, teachers should be able to distinguish what they want to share and what they want to profit from; what they want to copyleft and what they want to copyright. Their ideas and plans should belong to them, and not to the company that hired them. I currently copyleft, and share often, things that work for me; but one day, when I get my act together, I would love making some copyrighted things available for a profit. I would have fun selling my intellectual property to other people who may not have 22 years of Adobe Photoshop and Illustrator experience in order to make things look a certain way; I would feel good about making money for it, and they would feel good about having these visual aides. What could be wrong about that? 5/23/2016 6 Comments Hollowing my bustIt's a rainy Sunday outside, and I am back to the studio -- this time, I have my husband with me. I asked him to take the picture below because I had no idea if the sculpture would survive the day :)
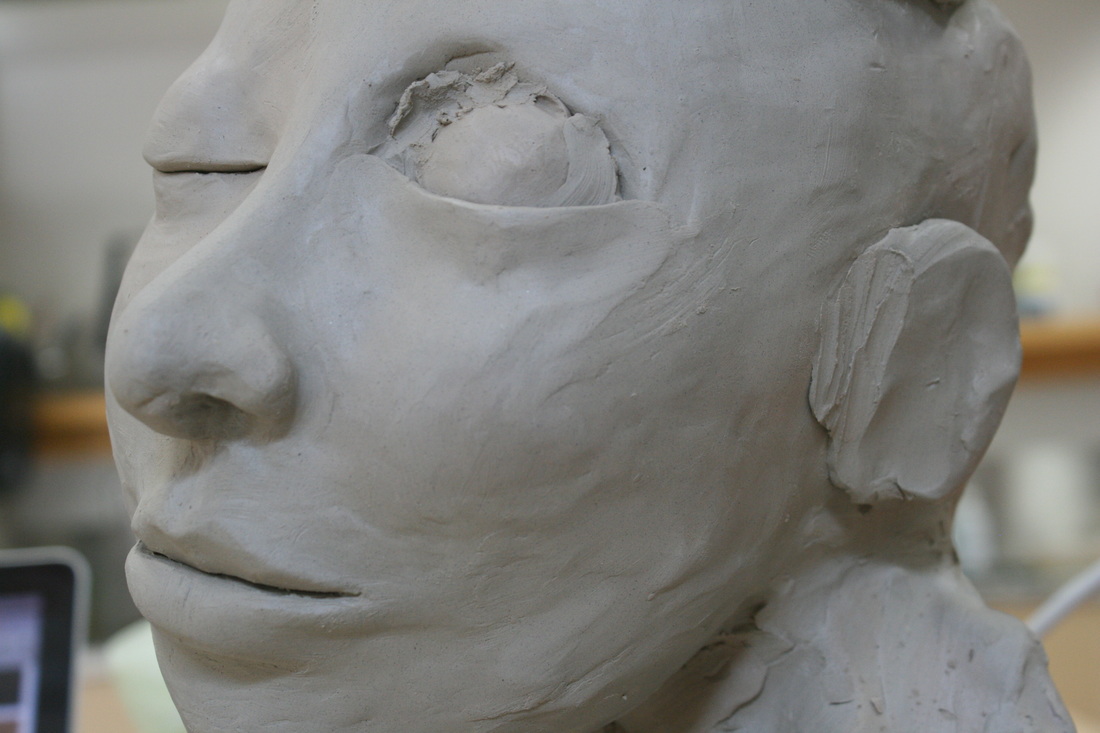
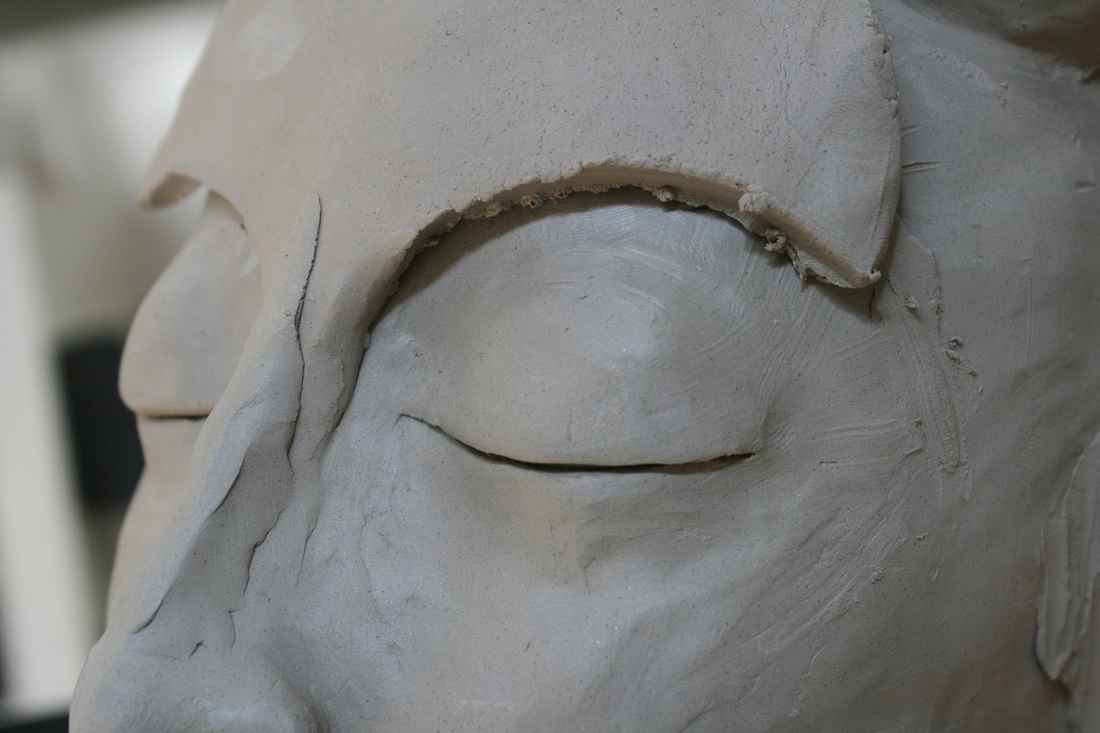
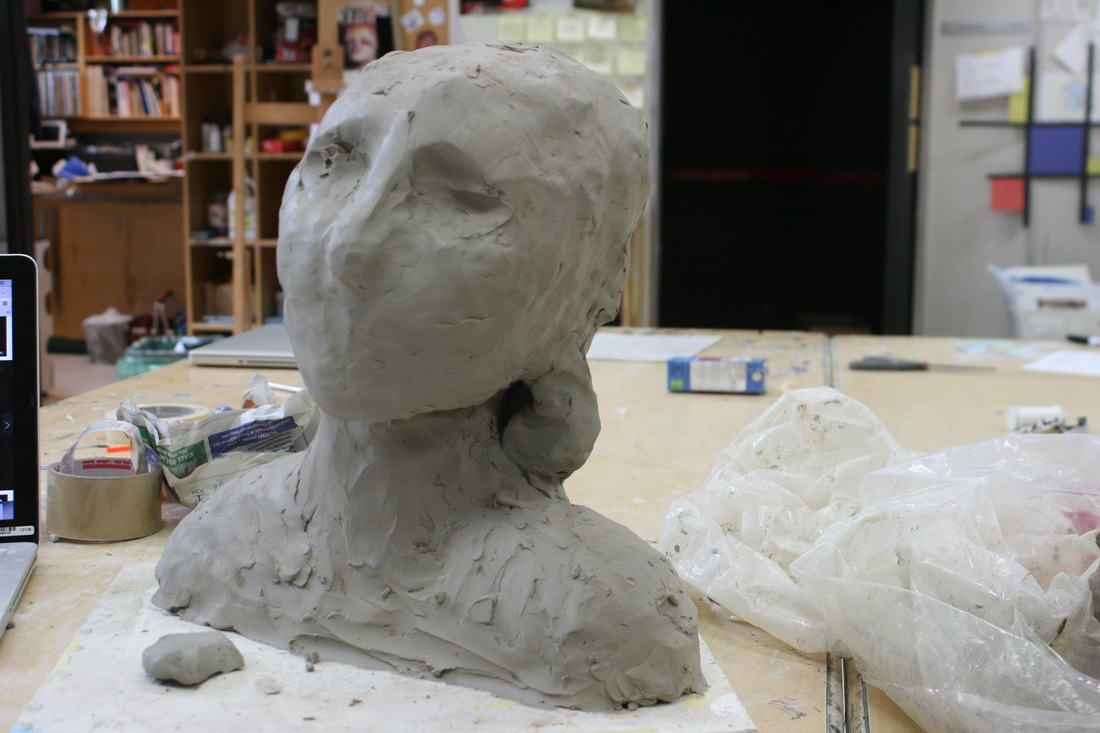
The video below is ten minutes long, but most of it is very accelerated to shrink about an hour of work into ten minutes. I only recorded the head and one of the shoulders being hollowed, but after the video was done, I went ahead and finished the other shoulder. I left the sculpture intentionally thicker than usual (about 3/4 of an inch to 1 inch thick) because I didn't want it to collapse; I'd rather have a slower drying, heavier sculpture than a deformed skull. I am amazed by how well the piece is holding off after all these days of working. Everything is still workable, even though it has become sturdier and solid. Now, I have to finish her hair and smooth her a little more. Really looking forward to completing this project! 5/23/2016 0 Comments Adding volume and hair Today is Friday, and I am again working at my bust. I am enjoying the process very much, and can't wait to work on her hair. I am worried about carving the volume out to make her hollow, but... one step at a time. I started by finishing her left eye. I always make my eyes by putting on the lower eyelid and then the upped eyelid, so there is a little overlap and the eye looks more natural; it is a different experience working at this scale!
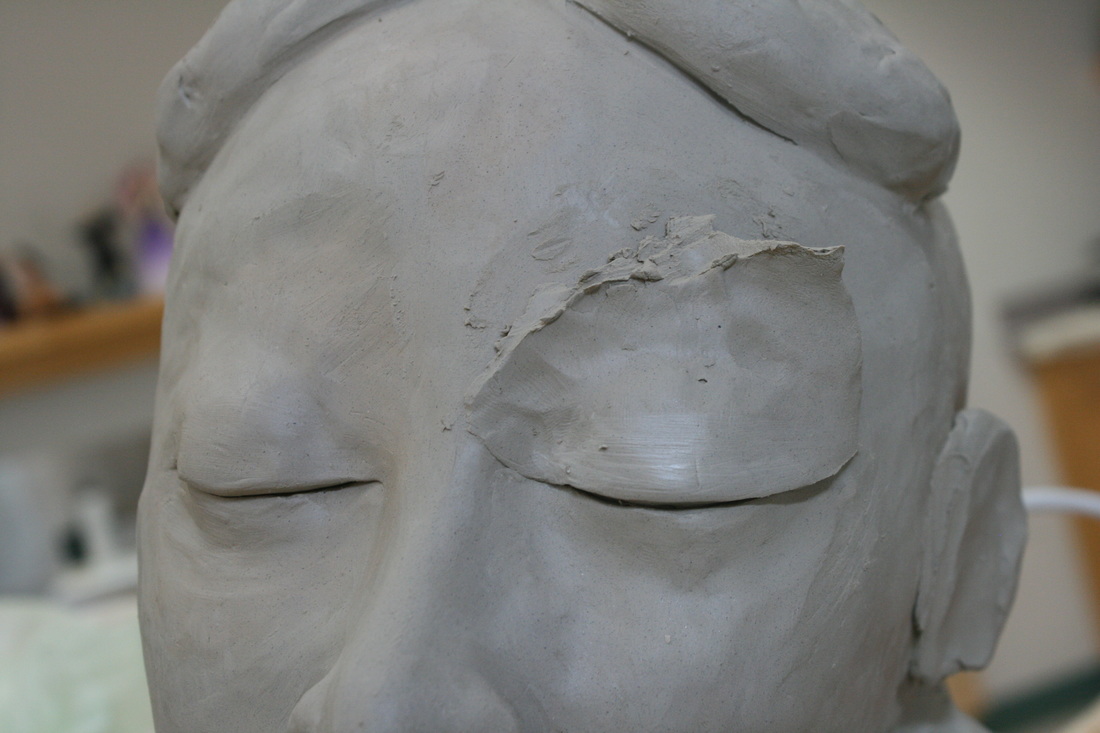
After adding the lids, I smooth them to blend to the skin. The first thing I realized when I looked at her today was how round her head was; this is because her head was built around a round ball of newspaper. My first step to correct this was adding more volume to her chin, nose and forehead. I made a large, flat flap of clay and cut off the shape of the eyes, so that it builds an eyebrow bone around her eye, accentuating the eye cavity.
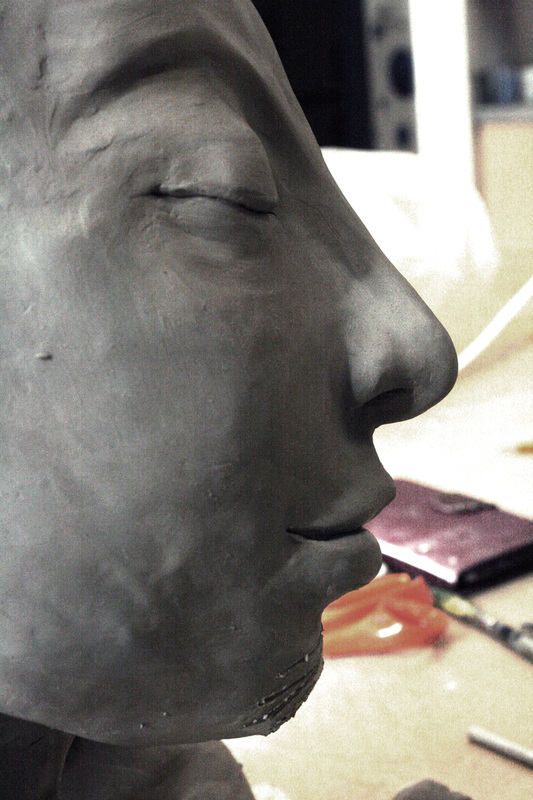
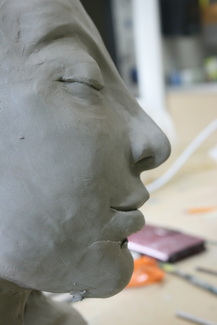
The forehead is starting to look better, but still a little flat; the chin addition was a huge improvement to her profile, however.
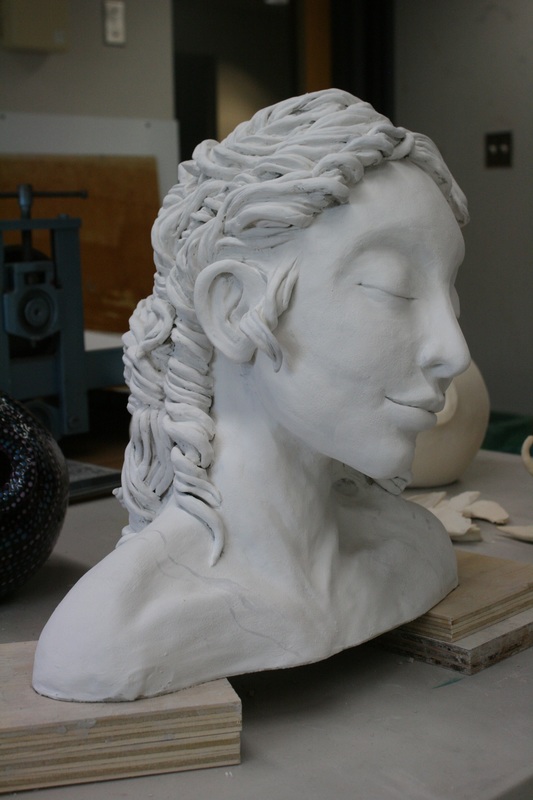
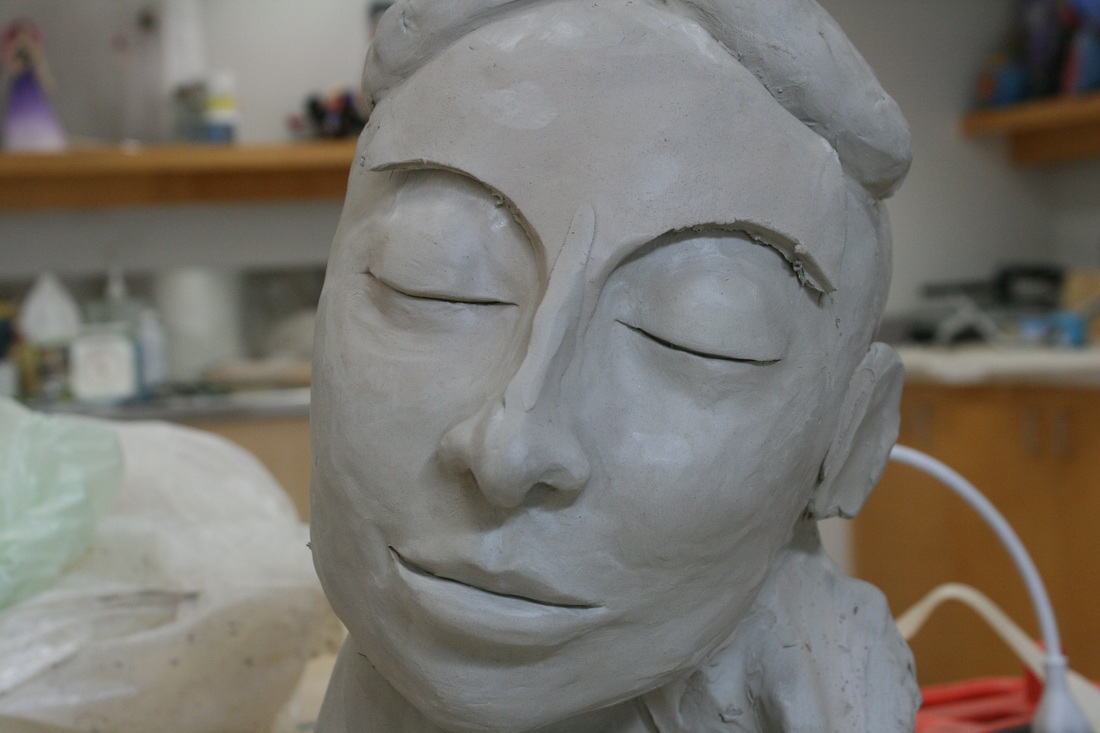
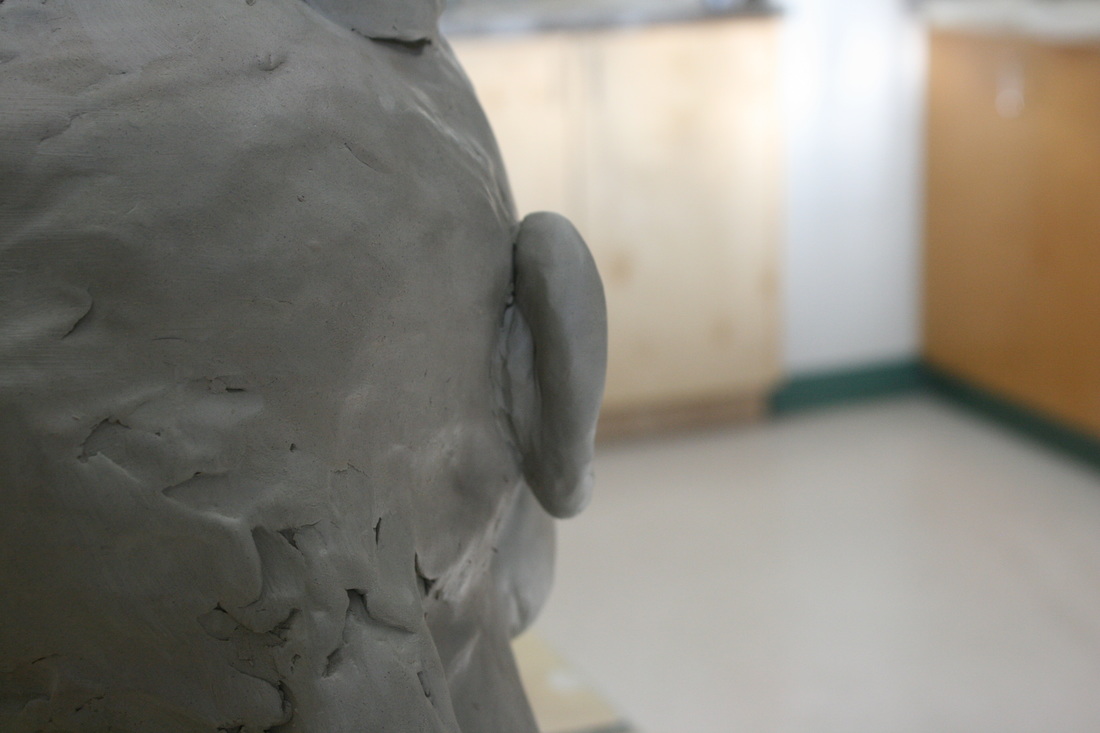
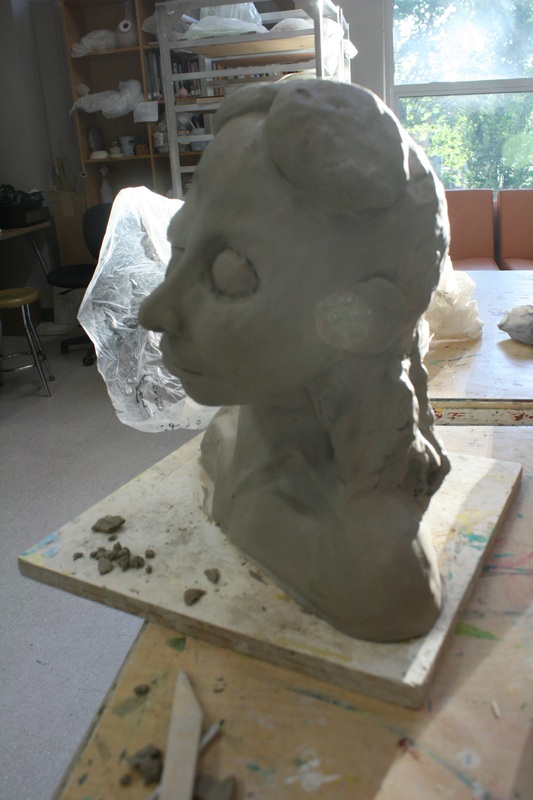
I added even more to her forehead to make her a little more human, and looked for some photographs as sources in order to make her ear. Below, a picture of her with a very flat, rudimentary ear...
...and below, you can see how the ear starter was made: a small slice of a circle works to separate the ear from her head, just like in real humans!
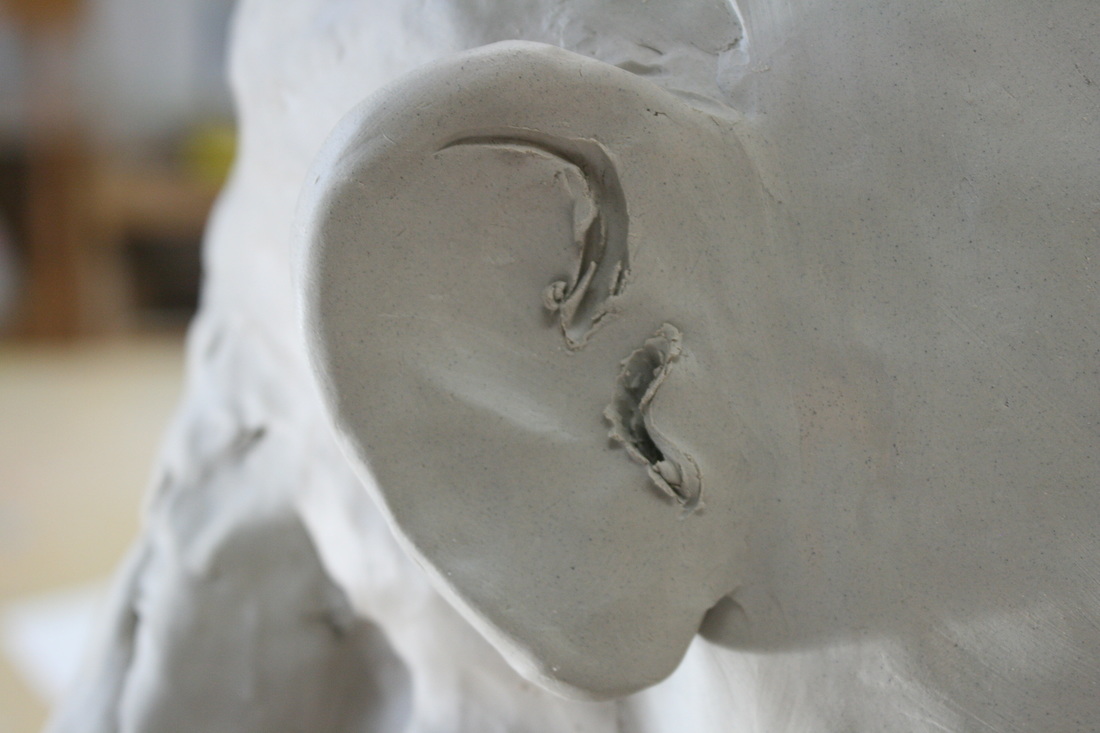
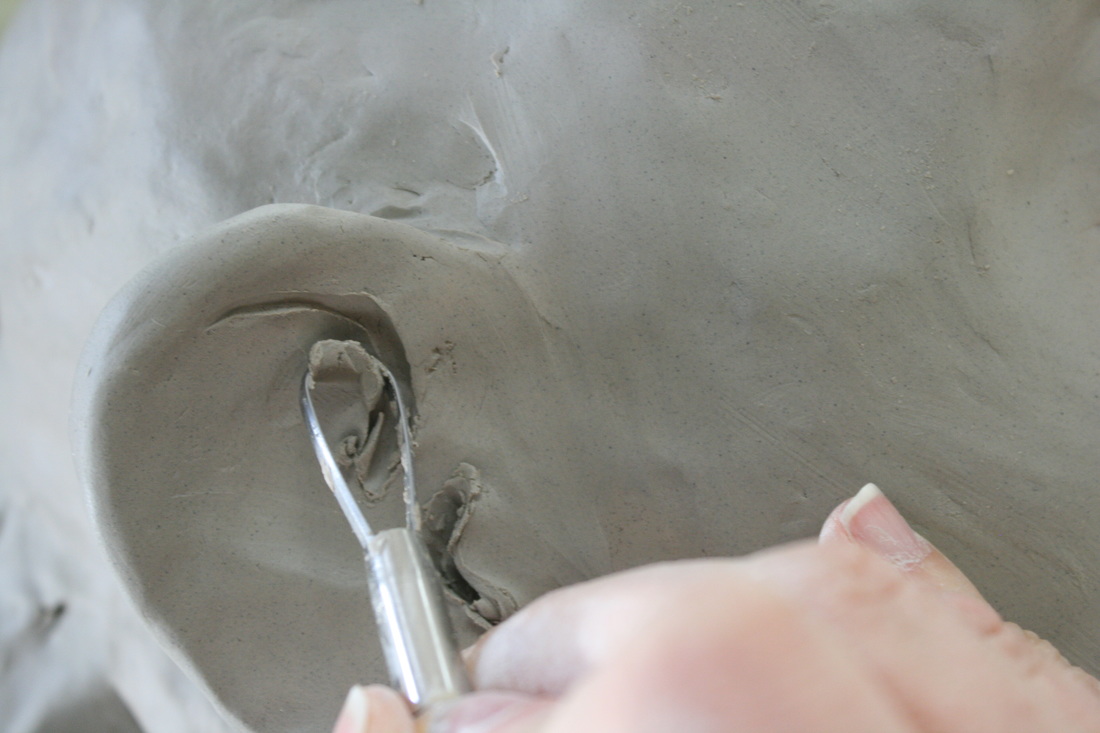
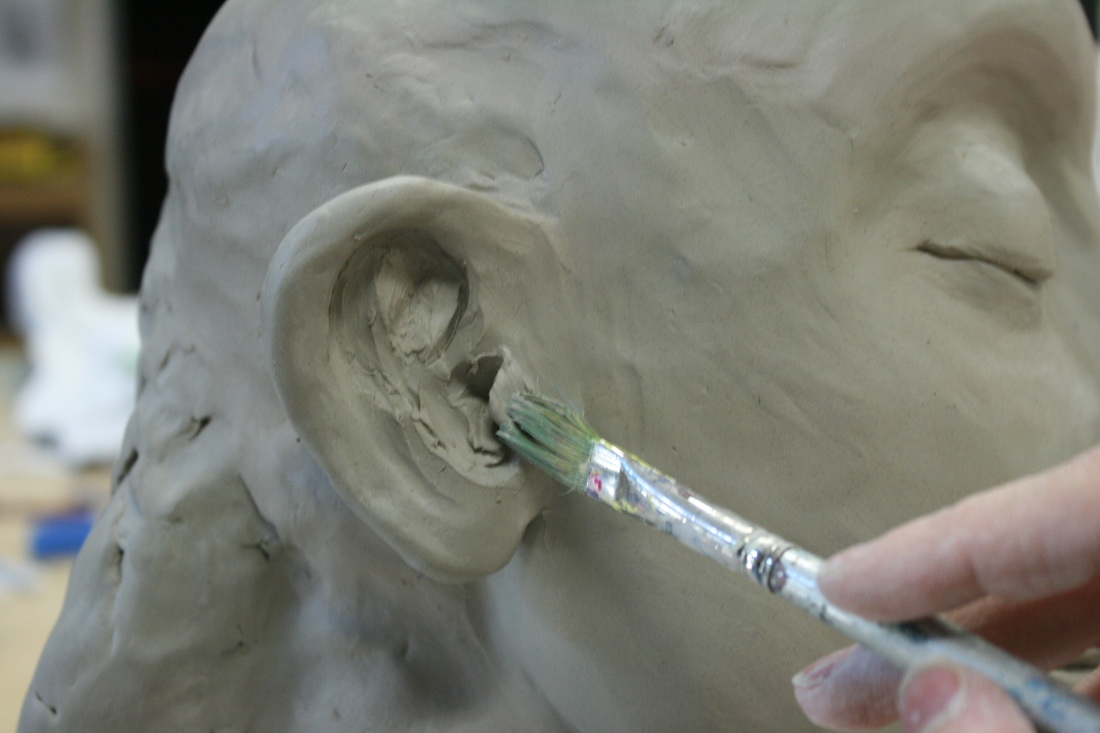
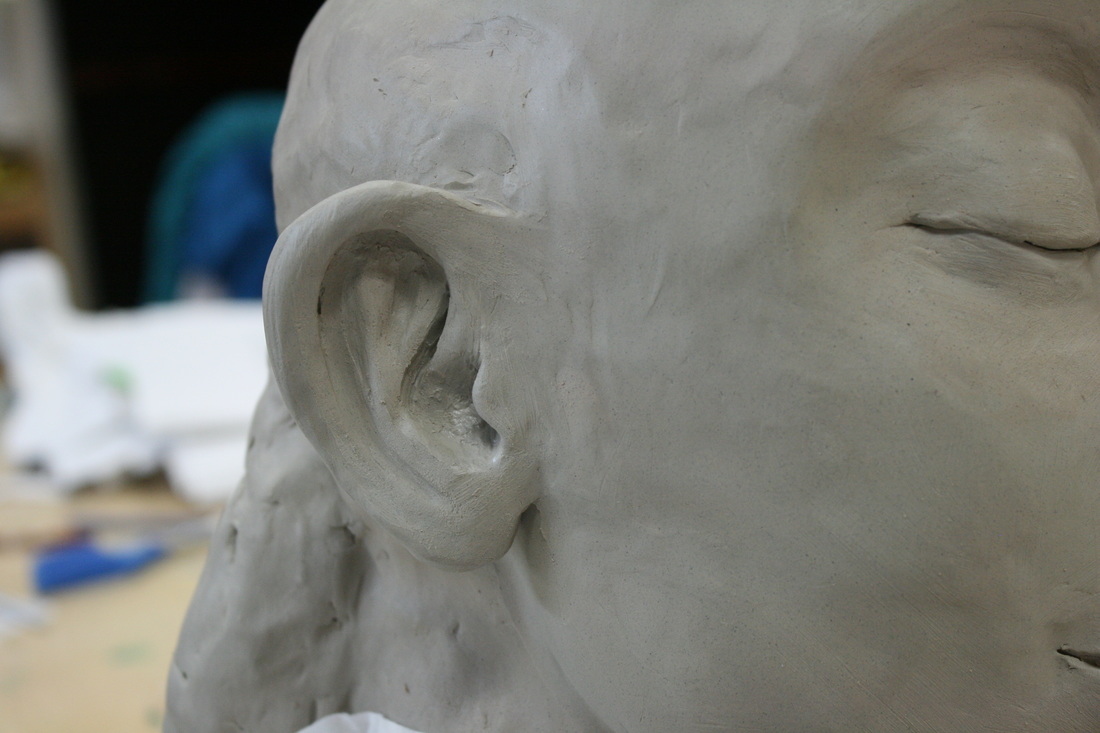
The ear is a tricky beast, so I figured I'd make step-by-step of how I made it right below. This also makes me think I should have smaller step-by-steps on building the nose, eyes and mouth; I'll do this in the end, when the bust is completed. First, I added the two starting lines: one for the upper lobe, and one near the ear canal. Then, I started carving the ear, switching between round carving tools and sharper ones, depending on how sharp I wanted the edges to look.
After I carved the valleys of the ear, I also added the ridges and peaks back where needed. One thing I have been using is a wet paintbrush, which I touch on areas I need to stay moist so that they don't dry too quickly. Things that dry too quickly tend to separate and crack off! The horror.
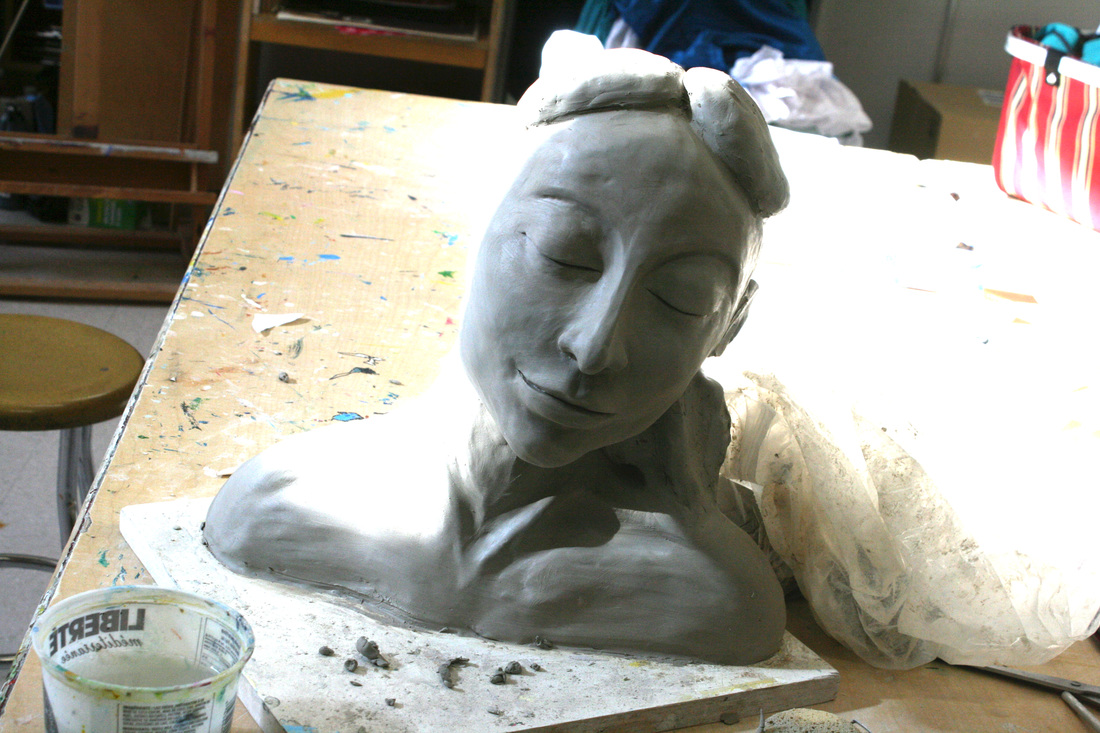
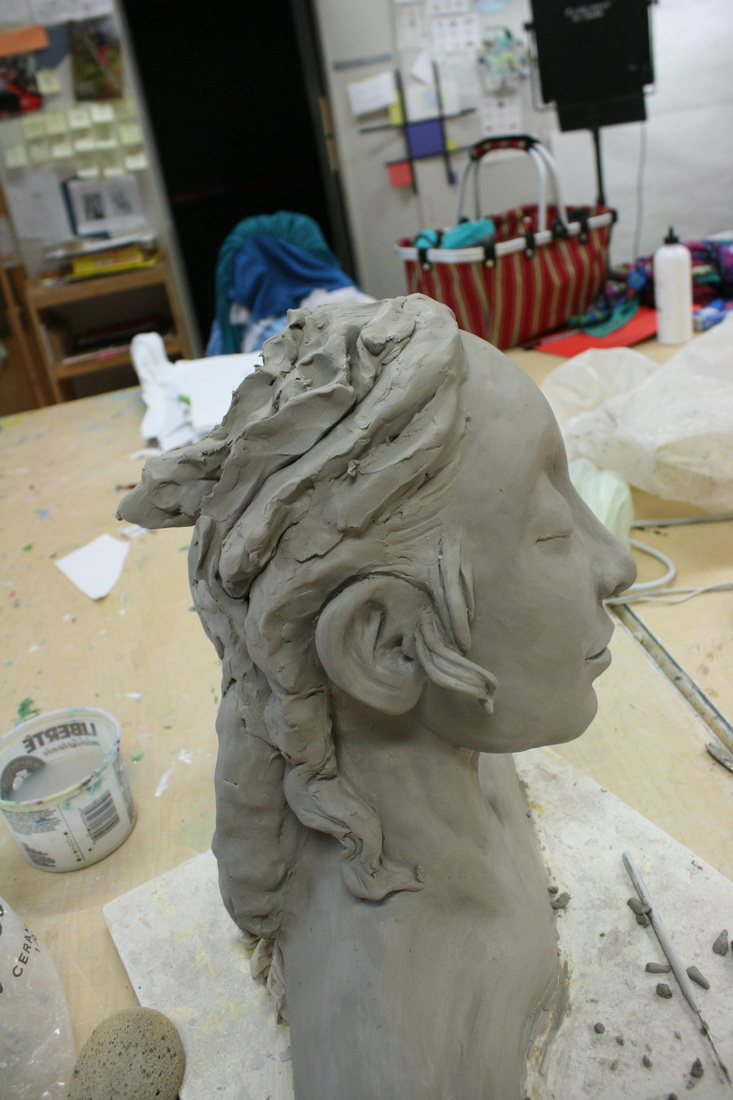
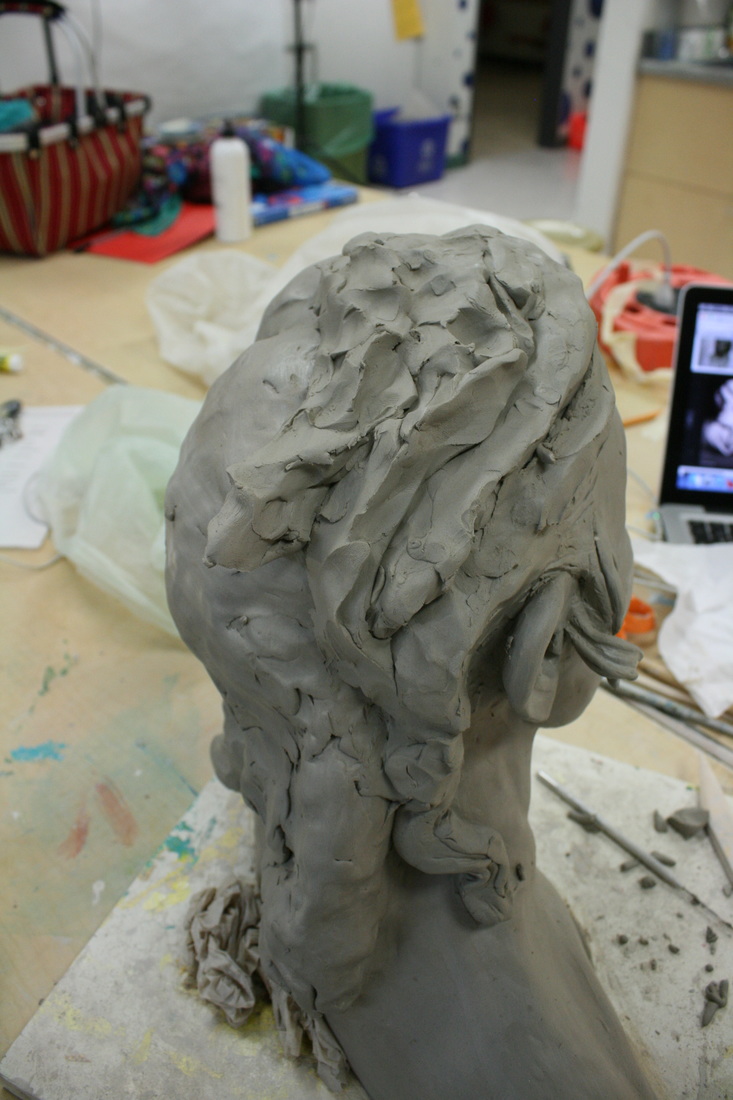
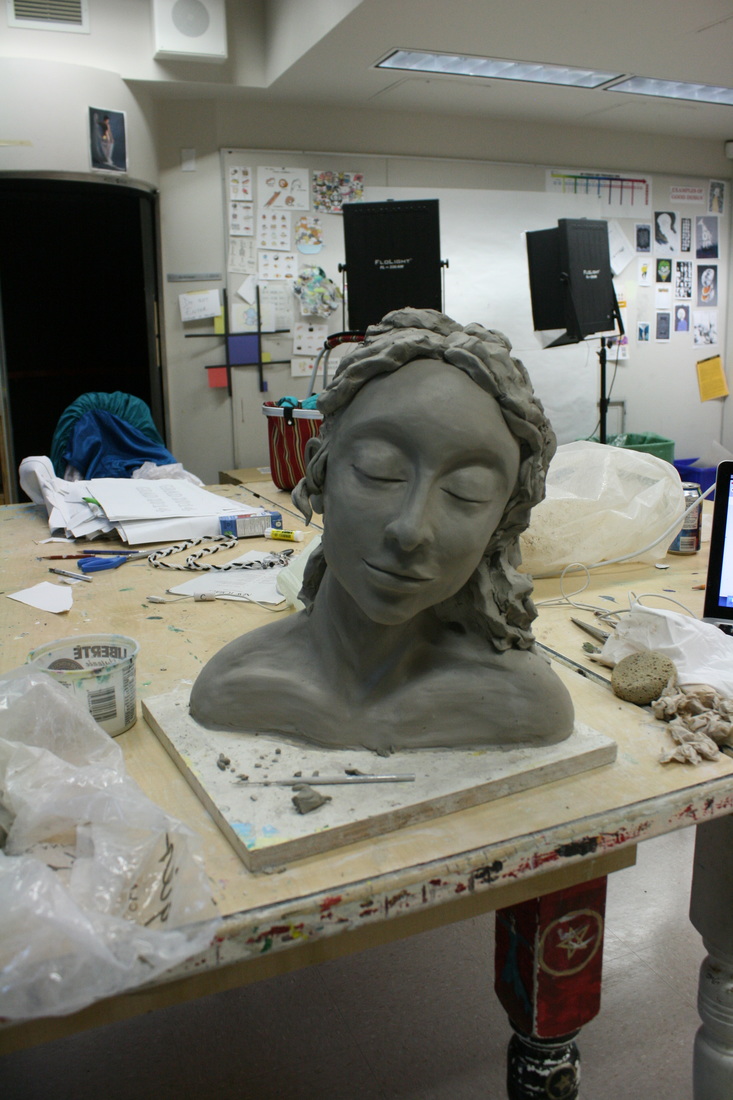
I started adding more rudimentary hair, but wanted to see how it would look like if I added a curl near the earlobe. This is what I have so far! 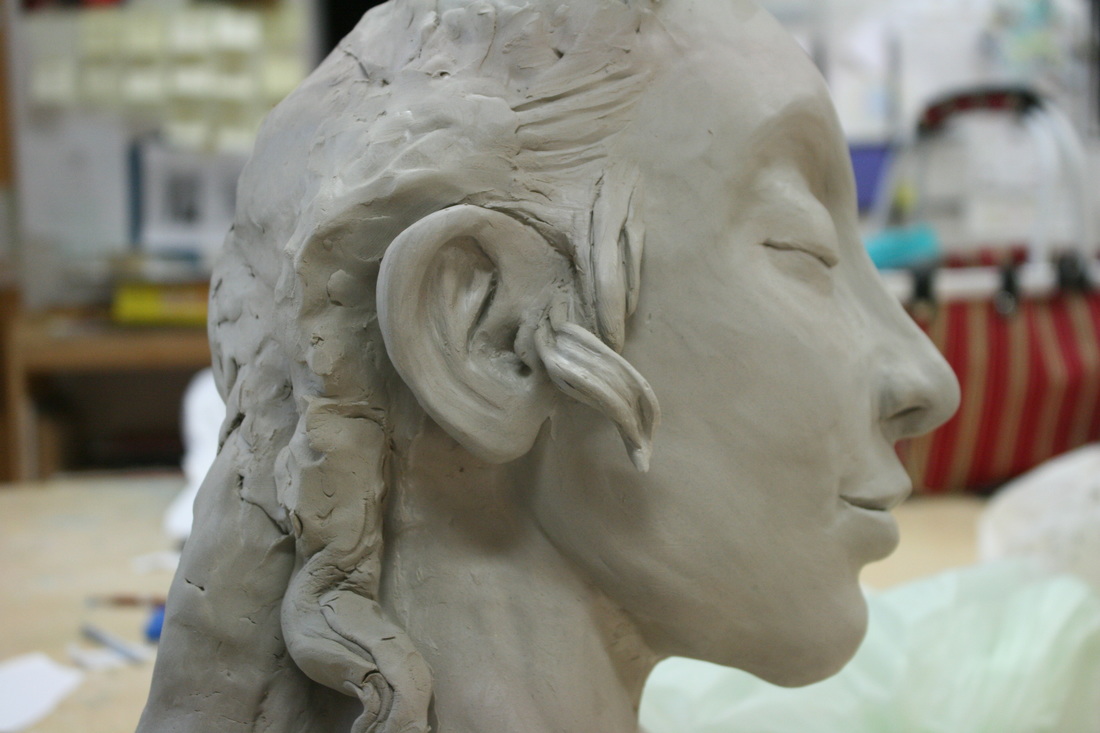 I also noticed the back of her head was missing volume. It looked like her cranium was too short, which made her look unrealistic. I started adding clumps of clay to the back, as well as more hair. To add the hair, I made long, thick coils, and added them by pressing and twisting as I went, a lucky technique I came up with which ended up giving my sculpture a somewhat Rastafarian look. I am not sure how much of the original dreadlocks I will cover in the end!
This is what I have in the end of the day. I feel this was a very productive day!
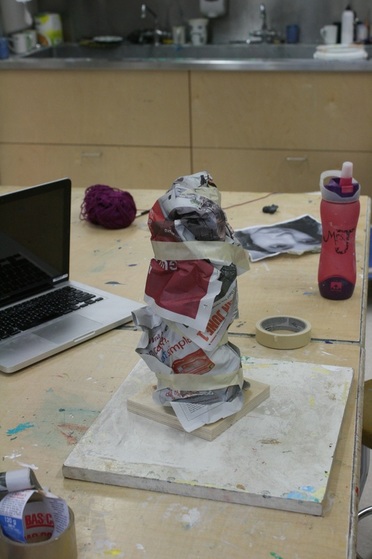
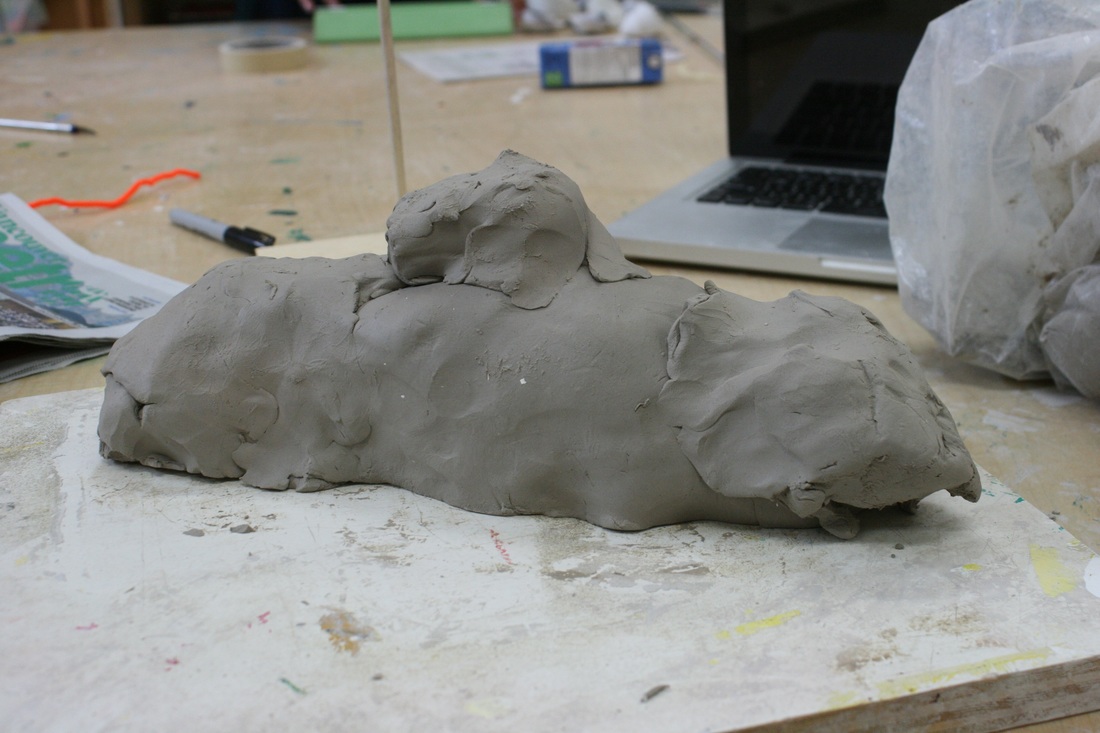
5/20/2016 2 Comments Working through mudSo, I received two boxes of fresh clay on Wednesday, and went on with my new attempt at constructing a bust out of clay. If you recall my last vlog, I was stuck between two valid suggestions: making the sculpture around newspaper to make it hollow; or, making the sculpture all solid, cutting in half later on and carving the guts out. I chose the first idea. I used a wooden stick glued to a board to make a skeleton type of structure in the centre of my bust; I proceeded to start squeezing newspaper around it. Below, a video of my first impression using the technique.
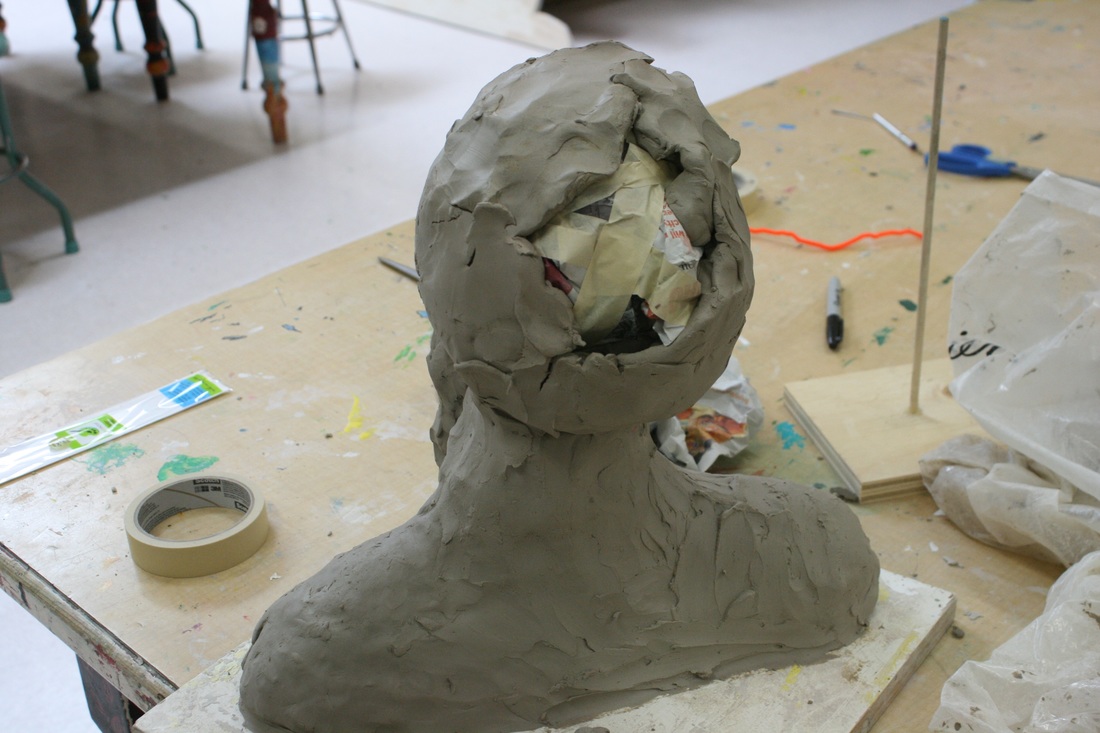
Things seemed to be going in the right direction; the problem I faced was, as soon as I placed a substantial clump of clay around the structure, it started to bend in a weird way, and I got extremely cold feet. So I decided to scrap the idea and go with a solid structure this time around. To avoid the same issue I faced last time, where the weight of the sculpture's head destroyed the sculpture, I decided to make the head itself hollow, building it around a large newspaper ball. The way I build this was, really, getting clump by clump and squishing it onto the piece until it got bigger and bigger, just like adding sand to a sand castle. Every new little clump was then smoothed out and air bubbles were squished out -- because as you may or may not know, air bubbles = kaboom in the kiln. The air expands and the whole thing breaks into a million pieces, just like Humpty Dumpty, and you just can't put it back together again. I was afraid still of the head being heavy on the neck, so I quickly ran down a long coil on her back coming from her head; this could translate as curls or a braid later on
After I finally closed the ghastly face hole, I started to add more and more clumps and smooth it all together. I didn't score or use water, just worked fast enough to ensure the clay stayed moist and pliable. I had a moist sponge next to me, and kept running my hands over the sculpture; as soon as a certain area started to dry out, I would run the sponge over it to moisten it again. At this point, I added a shape for the nose and chin, and also pushed my fingers into the eye sockets to indicate the eyes. I started adding more and more volume on the cheeks and under the neck, as well as the skull. I added two shapes on the back to indicate shoulder blades.
People came and looked at this point, and didn't know what to say. One girl called it Voldemort. I pointed out it did have a nose. While I added some of the future hair, I asked a student to take a photo of me. It gives an idea of the size of the bust so far. I'd say it is close to life-size.
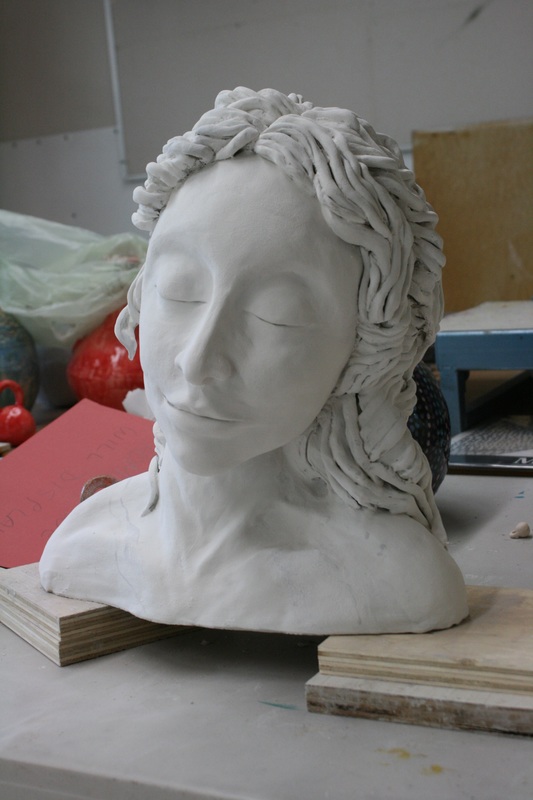
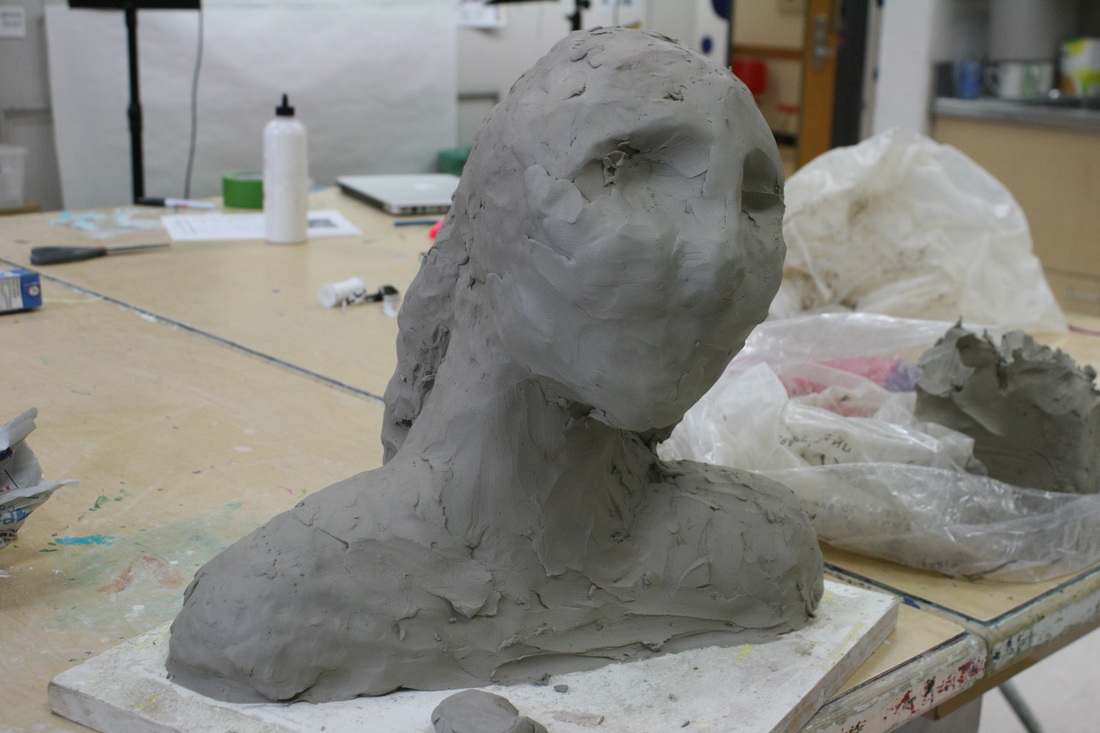
After spending a good long time smoothing her skin with my hands and adding more clay, I carved out the space above her clavicle and some areas on the neck, and added bits here and there. I made her a mouth -- which turned out too big but I didn't want to change it. I also added a large eyeball in each eye, which I always do before adding eyelids; this makes the eye much more realistic. However, this time around, I decided to make the eyes closed. Her nose turned out OK, but a little big.
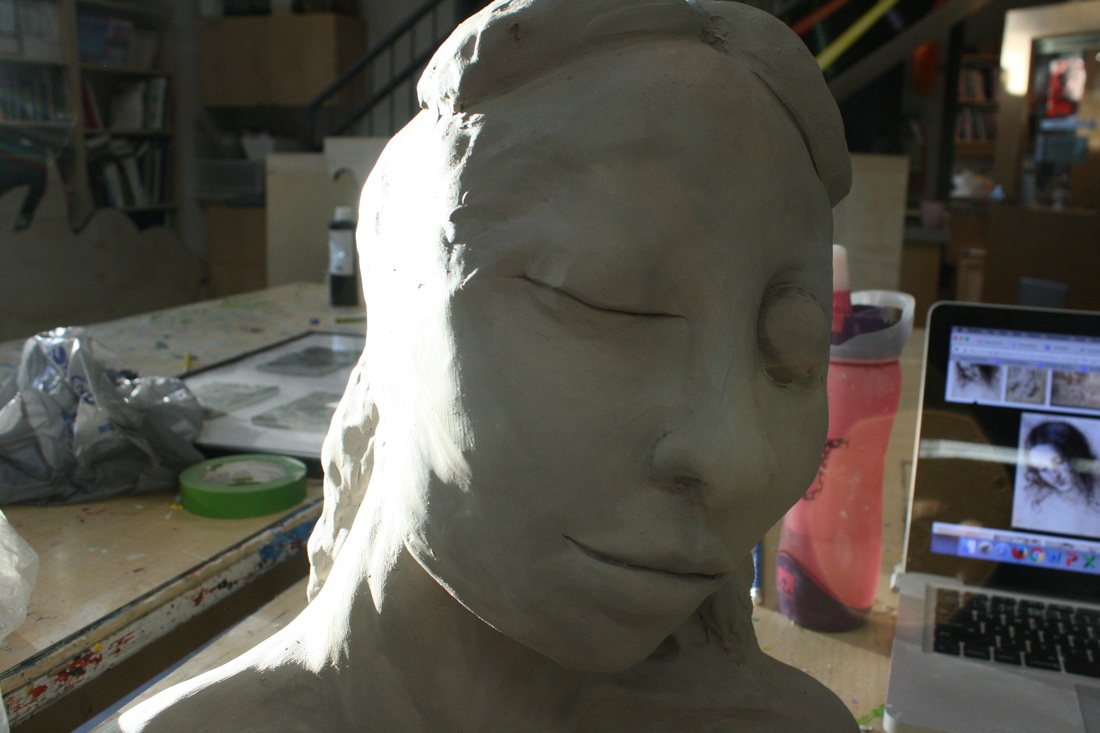 I think she is turning out really nice. I love her little smile. She has strong features... really not my intention. I was going for sweet Renaissance and ended up doing warrior princess... darn. :)
Looking forward to working with her again! |


 RSS Feed